Vault Safety template revisions include changes to Vault configuration for general usability improvements. Template revisions are not automatically rolled out to existing customers.
New Vaults created in 22R2 or later will have the following settings by default. Vaults created in an earlier release can optionally be updated to match these changes. The sections on this page provide the instructions to enable these changes.
This page does not cover how to update your template to support new features. The What’s New in 22R2 page outlines which features require configuration upgrades, and provides links to enablement instructions for each feature.
Configure Standard and Custom Tabs for Safety Suite Manifest Update
Configuration updates have been made to the 22R2 template for manifestation support. These configuration changes are documented in Enable Safety Suite Manifest Update and Tabs.
Update Create Document Action for Literature Documents
Perform the following steps to include literature documents in outbound E2B transmissions for a Case by default, if applicable:
- In the Admin area, go to Configuration > Document Lifecycles > Case Source Lifecycle.
- In the Event Actions tab, select Create Action.
- Create an event action using the following image:

Rename the Expectedness Section for Case Assessments
Since the “Expectedness (Local Datasheets)” section in Case Assessments will now include Core Datasheets as well, follow the steps below to rename the section:
- Go to Configuration > Objects > Case Assessment.
- In the Layouts tab, go to the Case Assessment Detail Page Layout.
- Update the “Expectedness (Local Datasheets)” section with the following information:
- Section Label: Expectedness
- Section Name:
expectedness__c
Create an Inbox Item - Reject Workflow
The following configuration was added to allow customers to provide a reason when rejecting an Inbox Item:
- Go to Configuration > Workflows.
- Create an Object Workflow.
- Complete the Create Workflow Details section with the following information and save the page:
- Label: Inbox Item - Reject
- Name:
inbox_item_reject__c - Lifecycle: Inbox Item Lifecycle
- Update the Start step with the following information:
- Next Steps: Create Step > Task: Reject
- Complete the Task: Reject step using the following information and images:
- Next Steps: Create Step > SC
- Task Label: Reject
- Assign Task To: Workflow Owner
- Instructions: Please provide a reason for rejecting Inbox Item ${Object.name__v}.
- Task Requirement: Required
-
Due Date: Workflow Start Date > + 1 Days

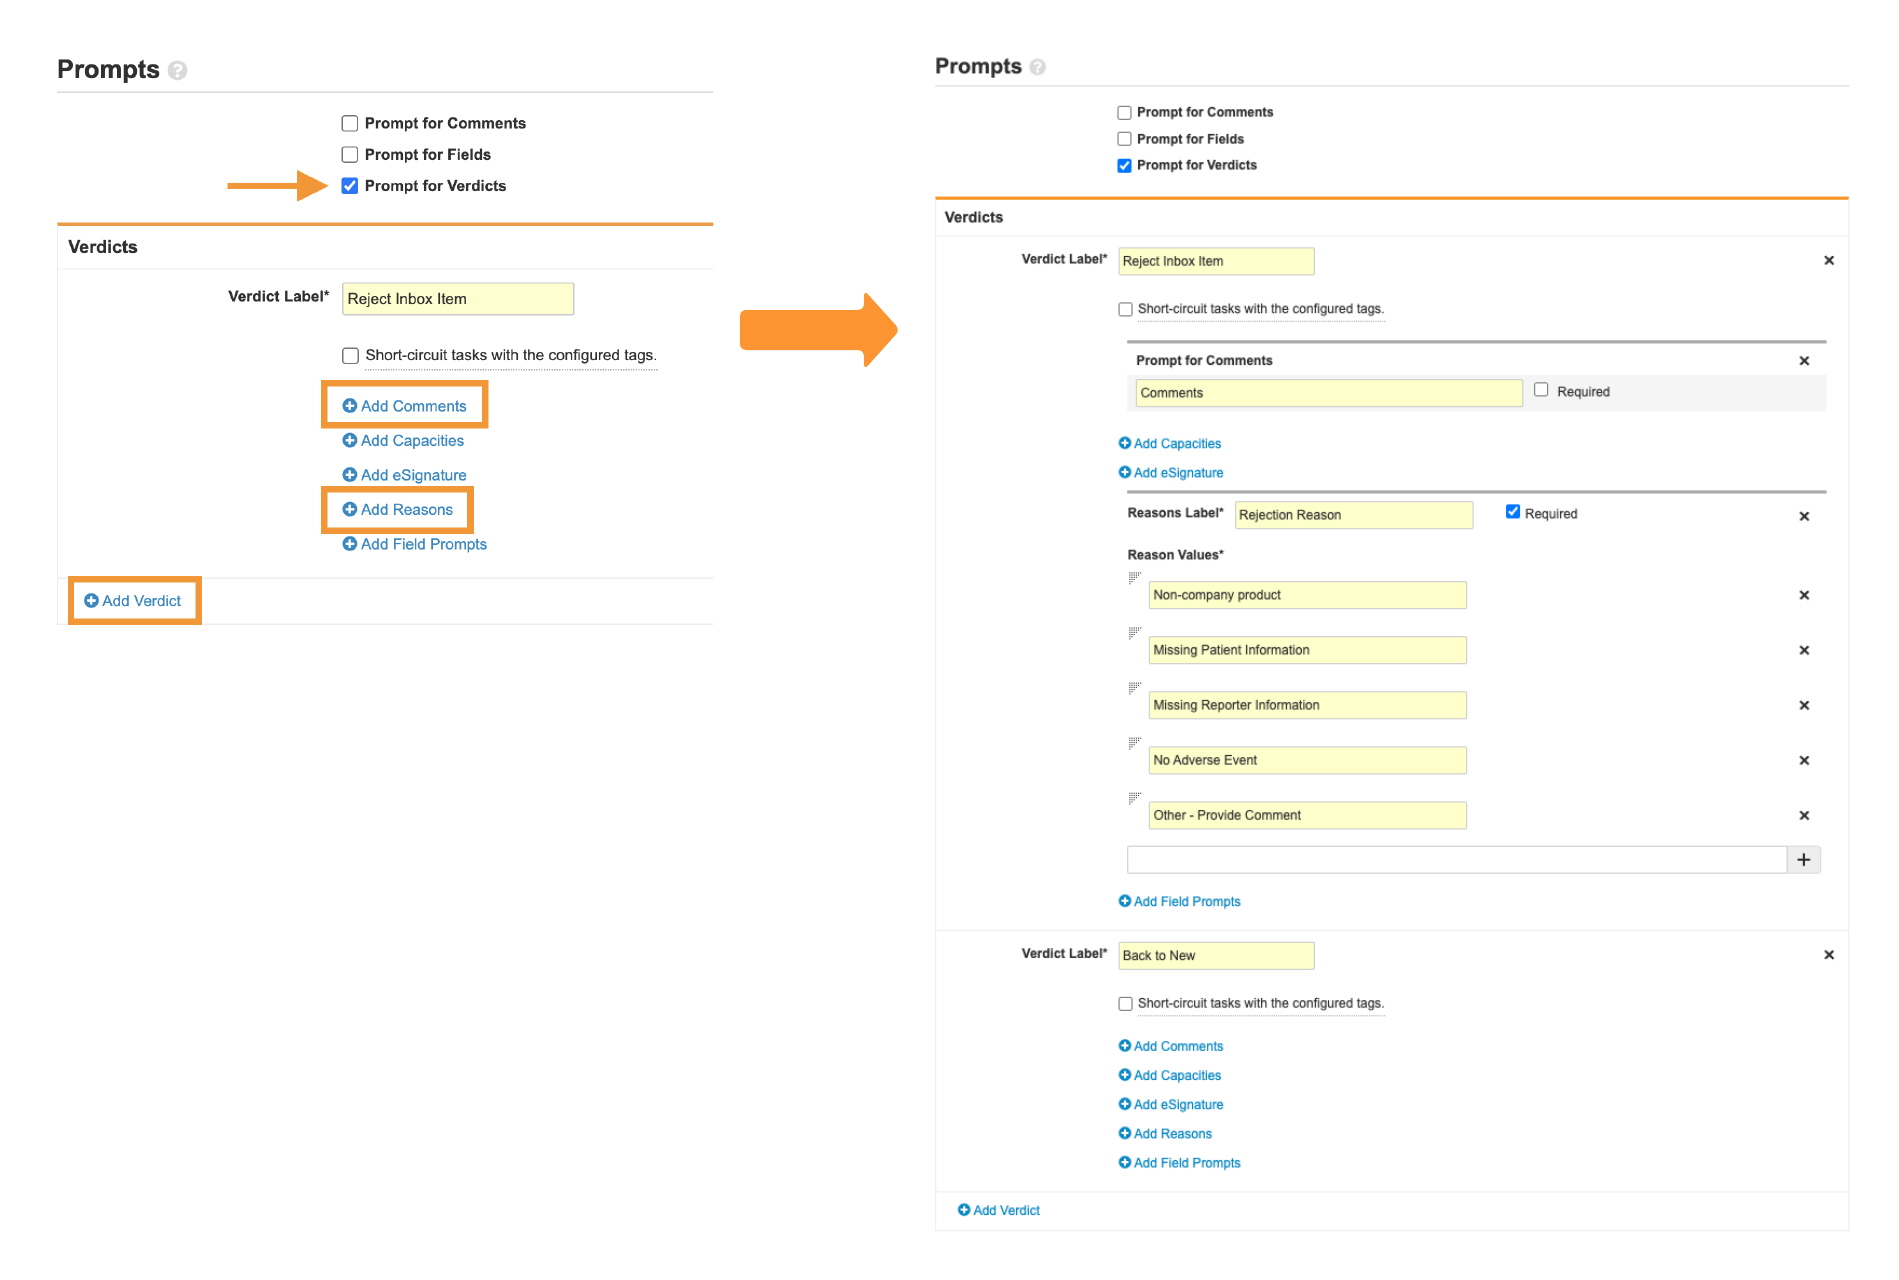
- Prompts:
- Verdict Label: Reject Inbox Item
- Prompt for Comments: Comments
- Reasons Label: Rejection Reason
- Reason Values:
- Non-company product
- Missing Patient Information
- Missing Reporter Information
- No Adverse Event
- Other - Provide Comment
- Verdict Label: Back to New
-
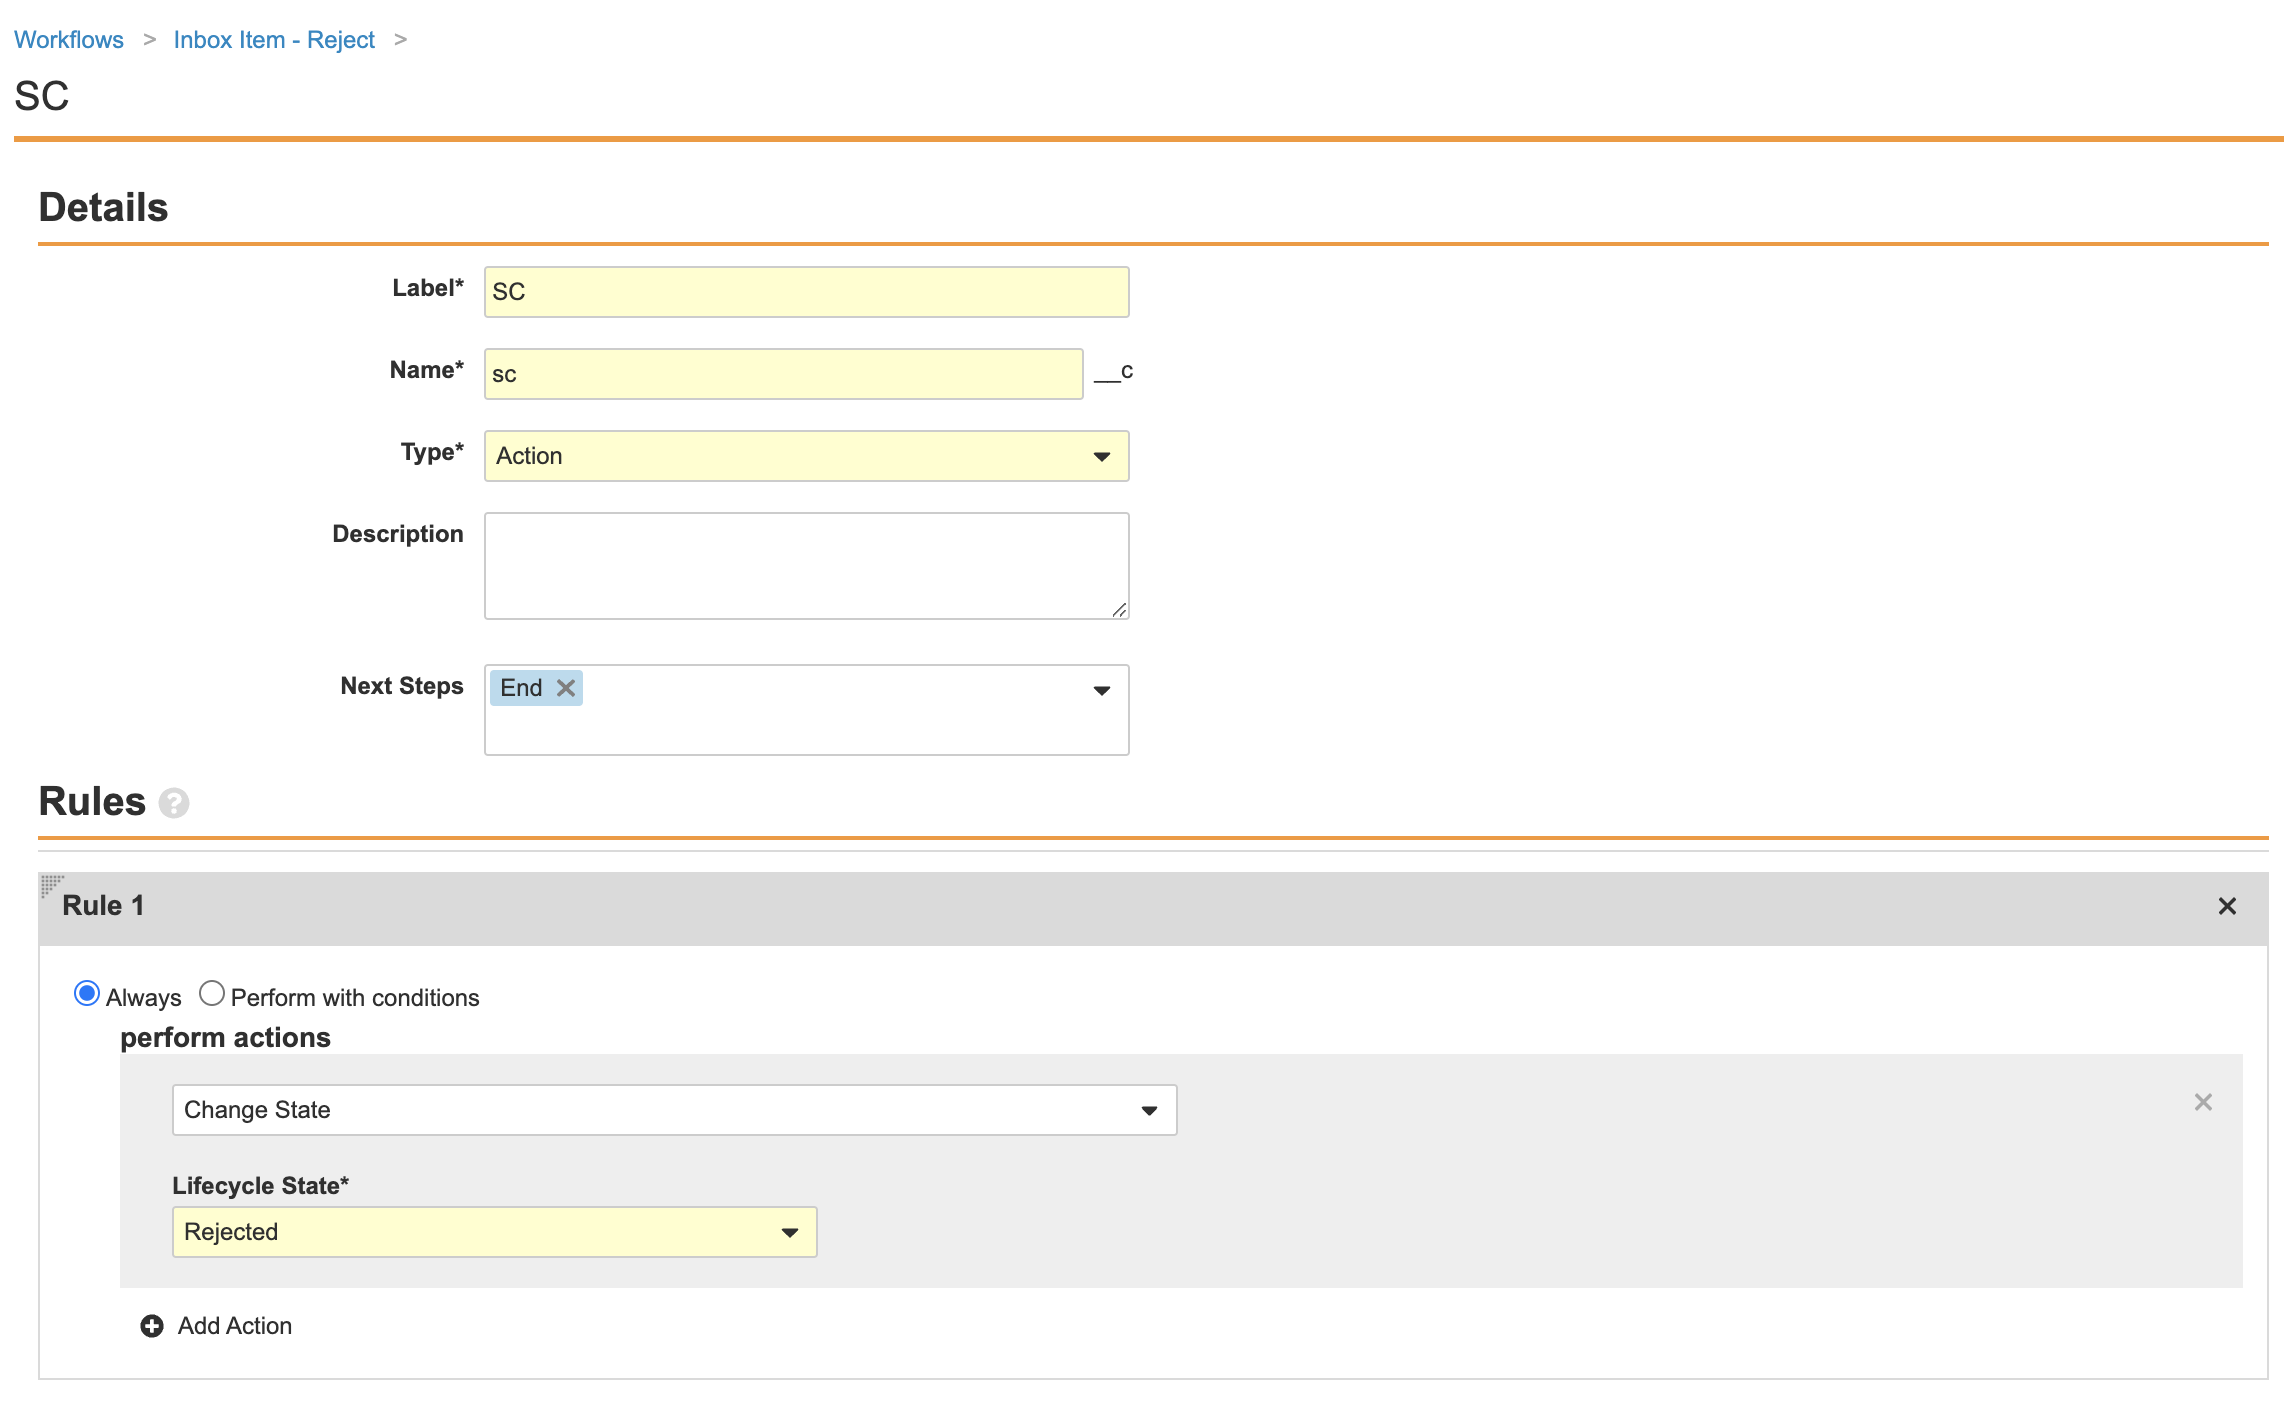
Complete the SC (state change) workflow step using the following image:
-
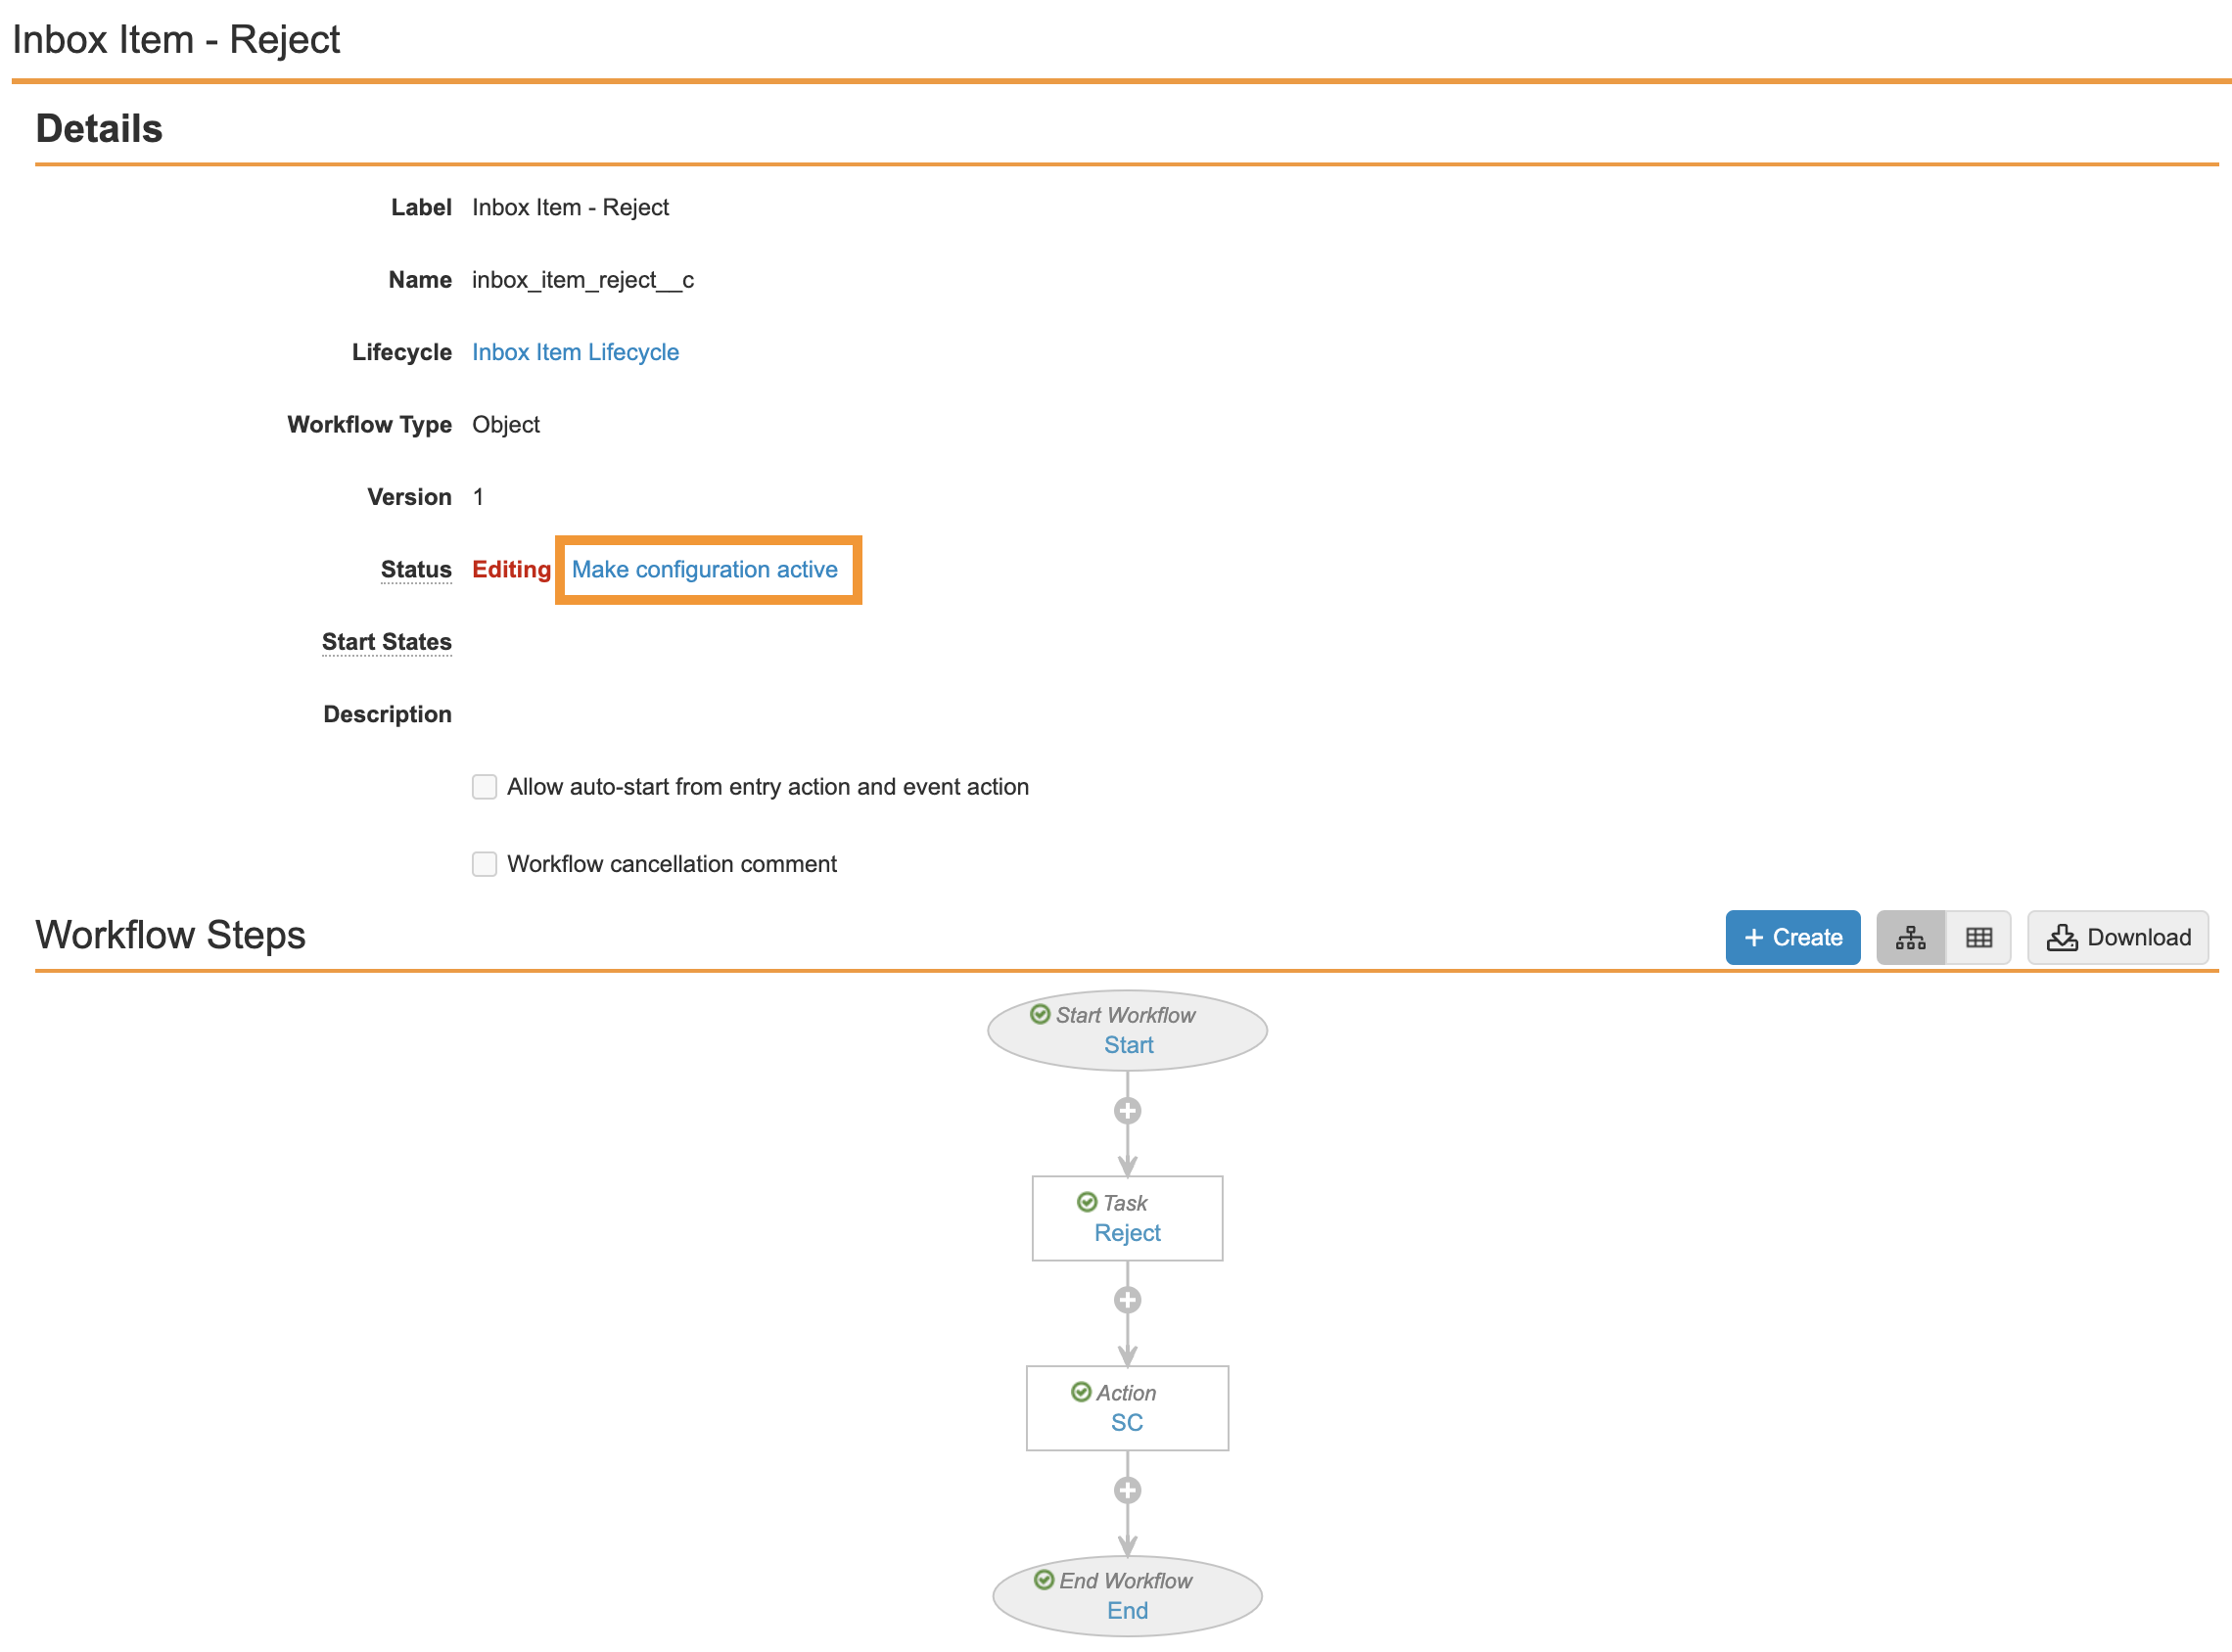
Ensure your workflow matches the following image and then select Make configuration active:
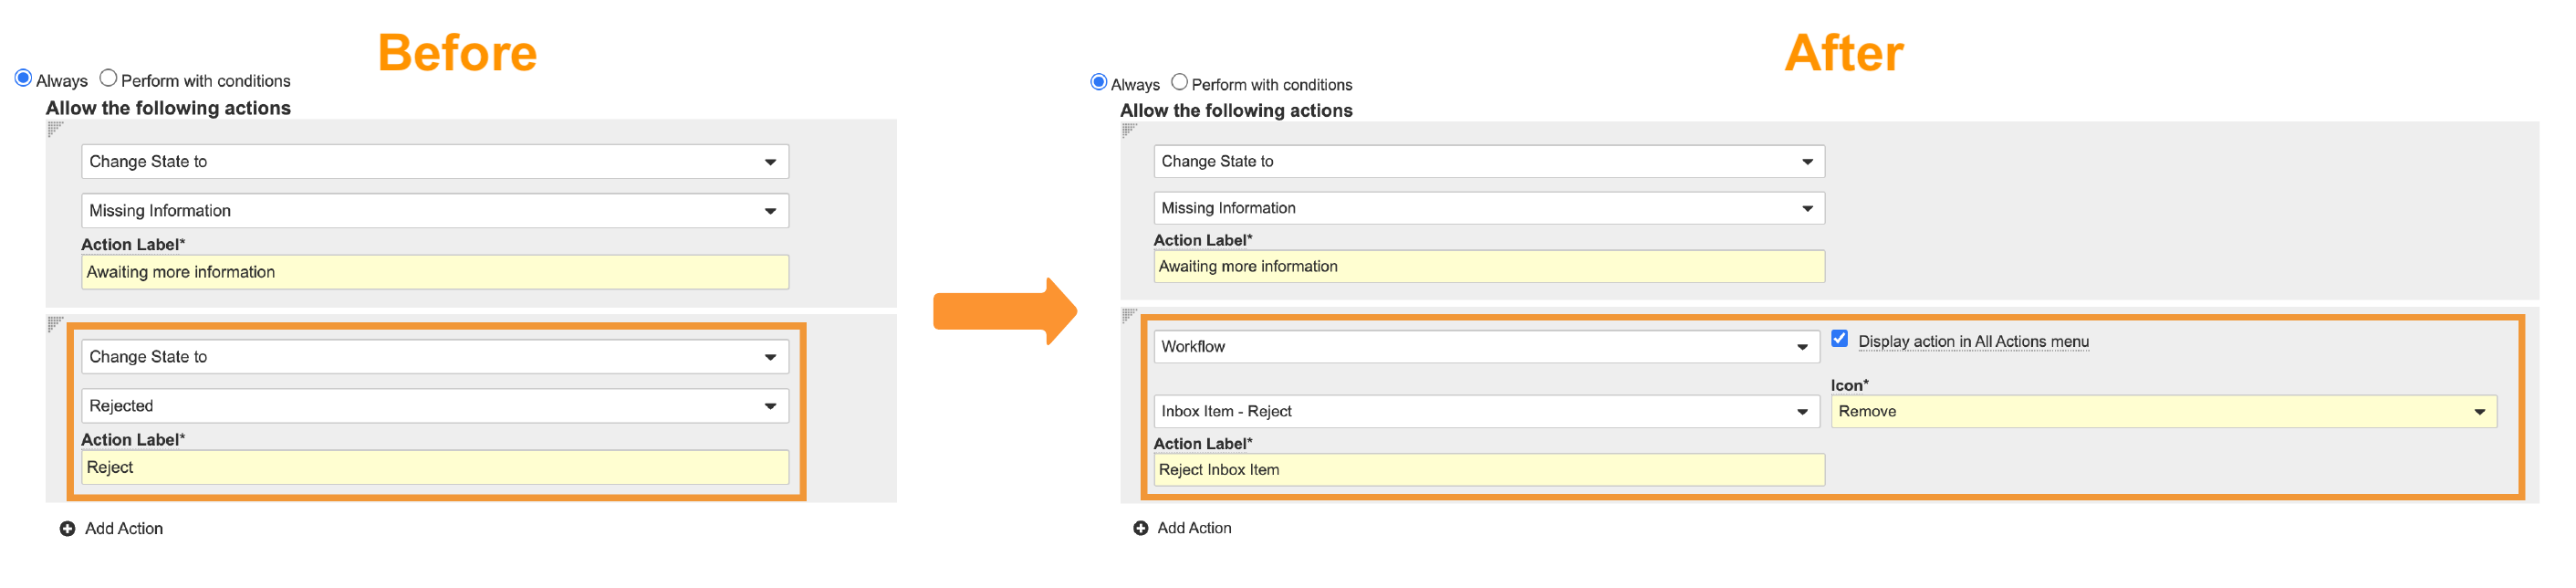
- To add the workflow action, go to Configuration > Object Lifecycles > Inbox Item Lifecycle > New state.
- Replace the Change state to Rejected user action using the image below:
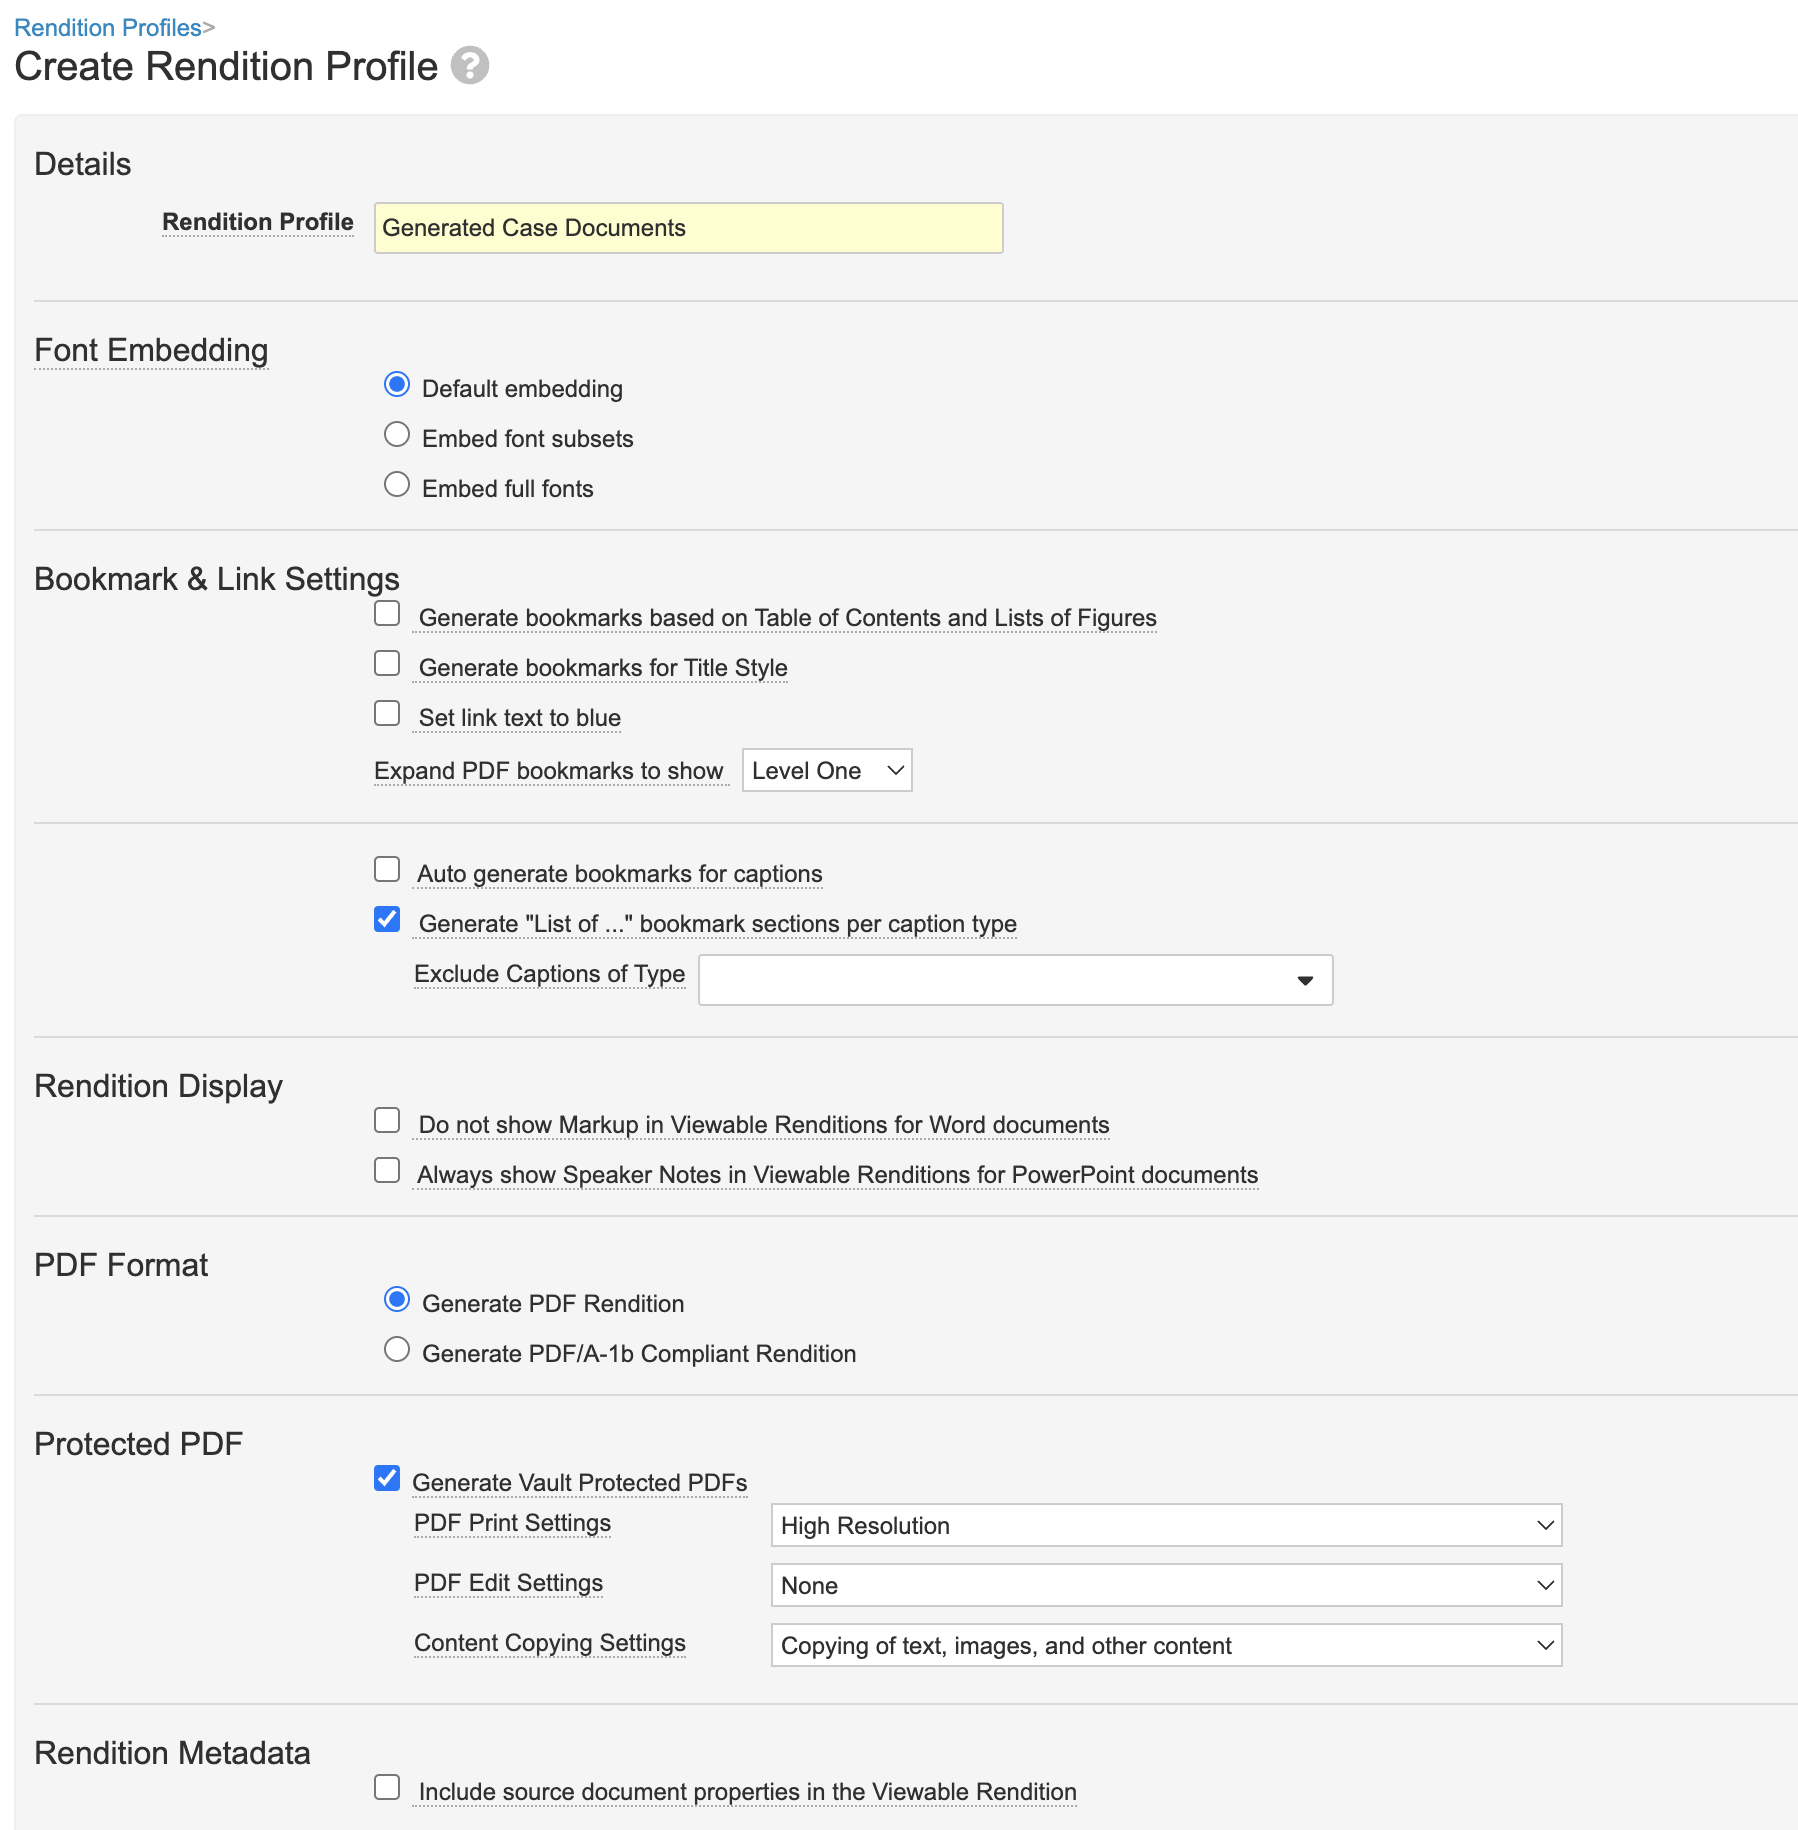
Create a Protected Renditions Profile for CIOMS and FDA 3500A
The following configuration was added to support the generation of protected viewable renditions for CIOMS and FDA 3500A. This ensures that downloaded CIOMS I and 3500A renditions cannot be edited.
Part 1: Create a New Rendition Profile
- Go to Configuration > Rendition Profiles.
- Create a new Rendition Profile using the following image:
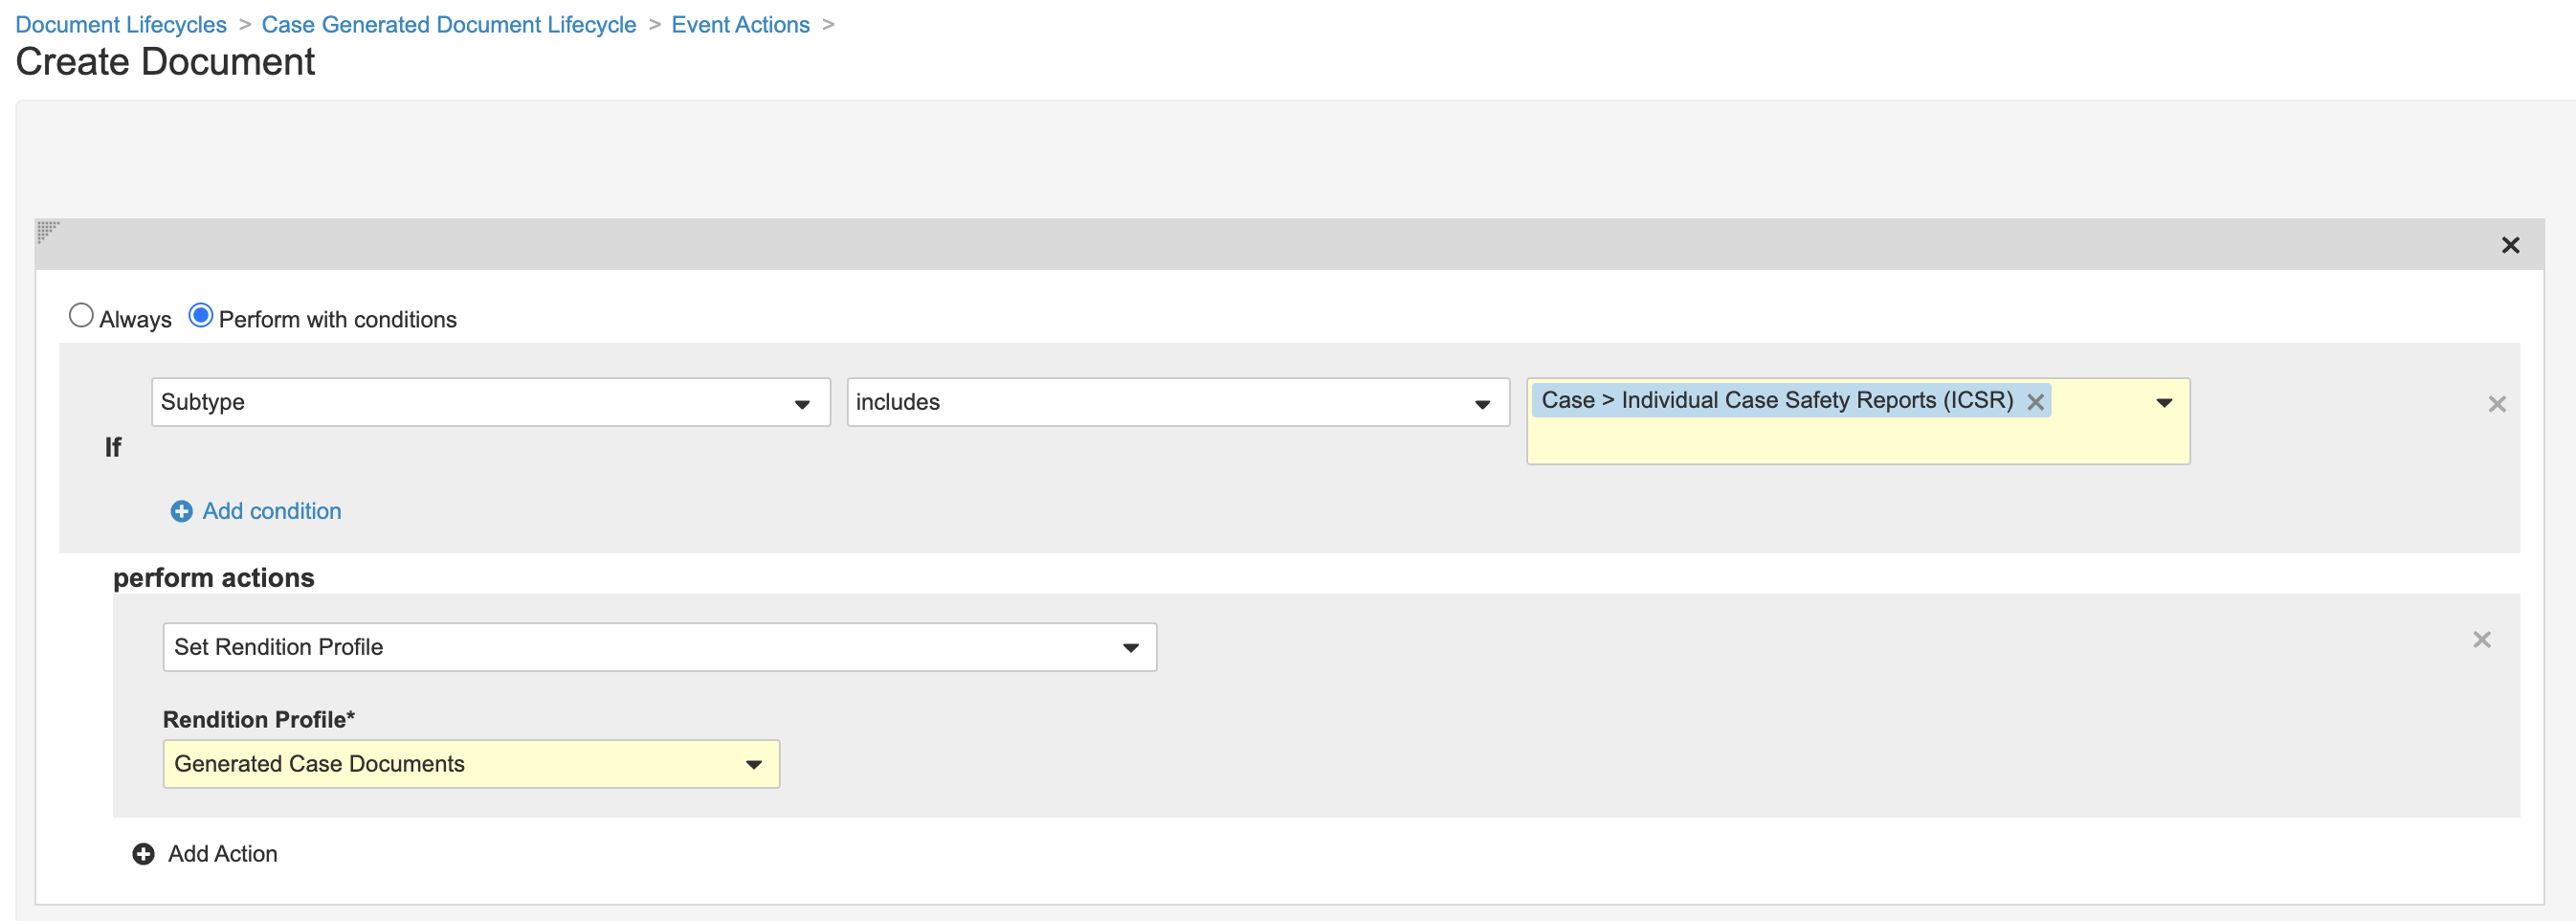
Part 2: Add Event Action to Case Generated Document Lifecycle
- Go to Configuration > Document Lifecycles > Case Generated Document Lifecycle.
- In the Event Actions tab, select Create Document.
- Create an Event Action using the following image:
Part 3: Add the Protected Rendition Profile Shared Field to the Case > ICSR Document Type
- Go to Configuration > Document Fields.
- Go to the Case > Individual Case Safety Reports (ICSR) document type.
- Select Add > Existing Shared Field > Rendition Profile (rendition_profile__v).
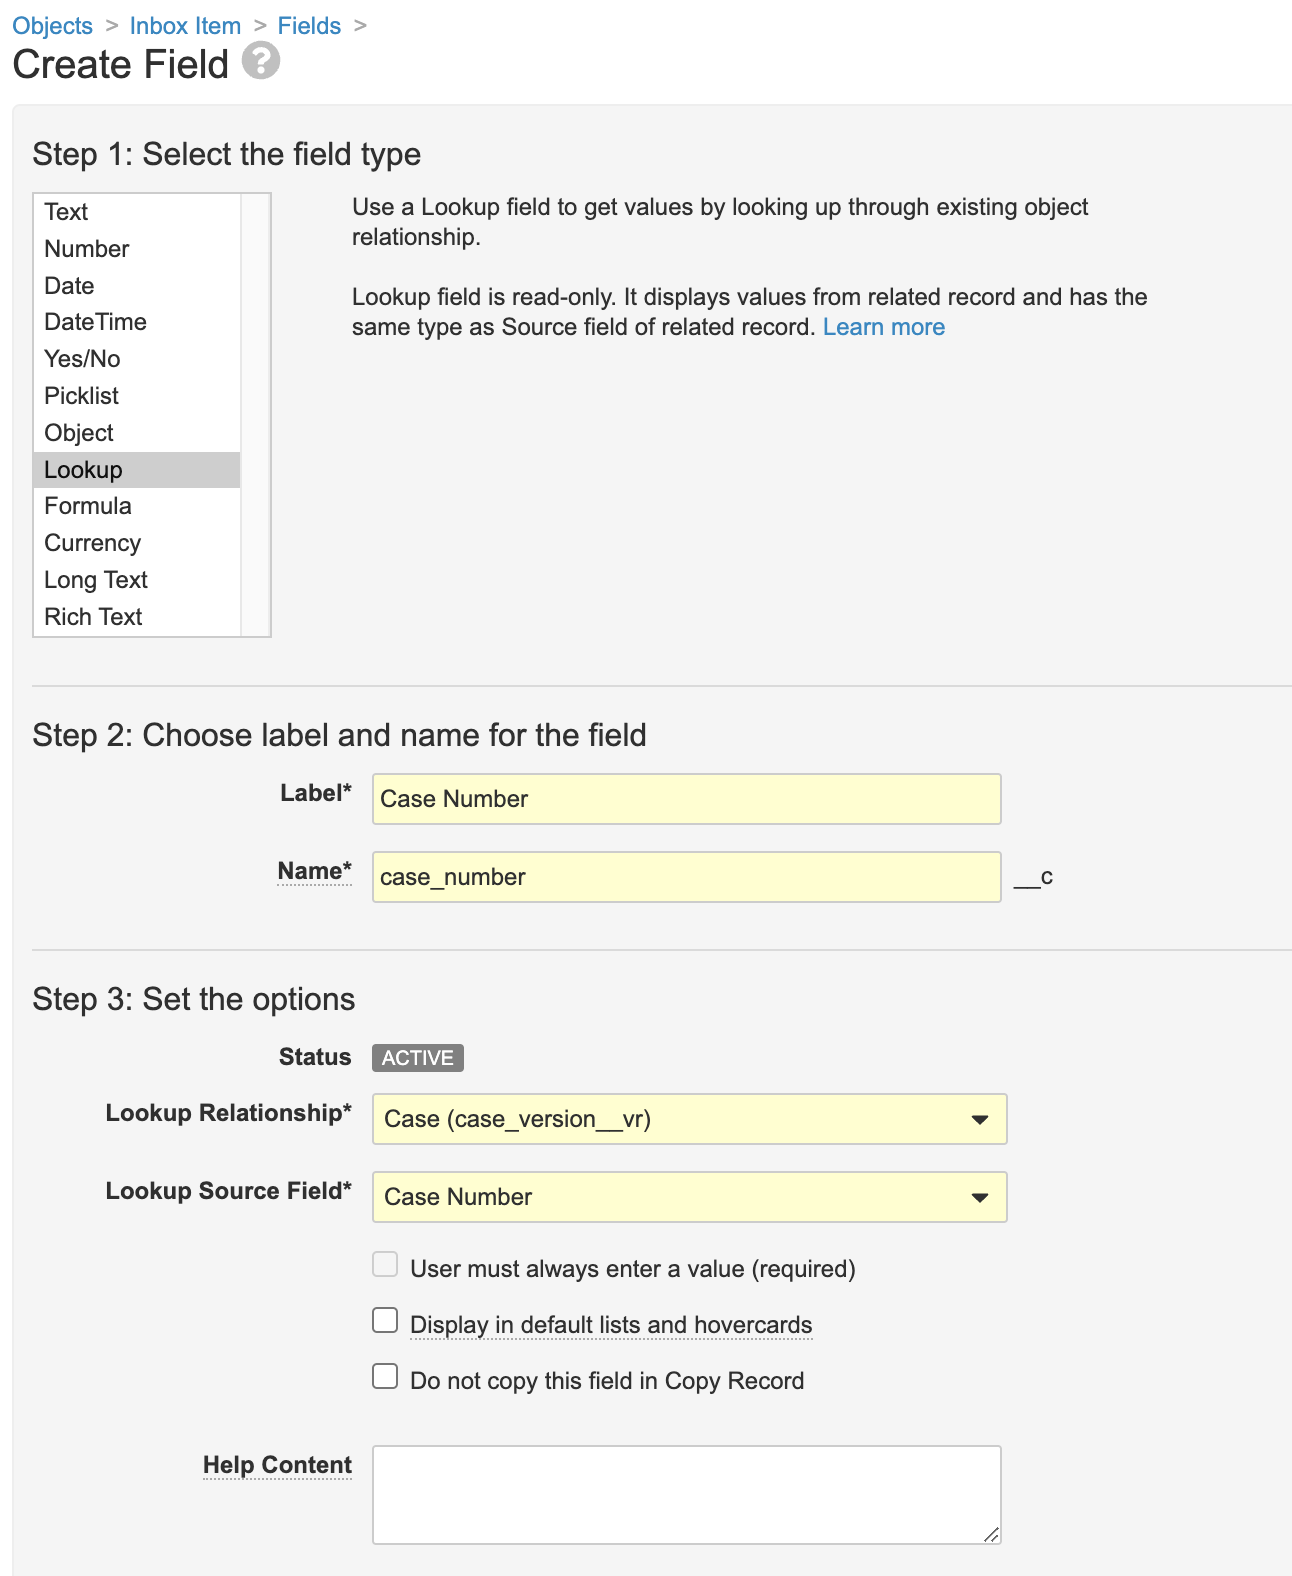
Create a Case Number Lookup Field for Inbox Items
Perform the following steps to add a Case Number lookup field for Inbox Items so that all Inbox Items for a given Case appear on the Case Number. This allows users to see all the Inbox Items that went into all versions of a Case.
Part 1: Create the Case Number Lookup Field for Inbox Items
- Go to Configuration > Objects > Inbox Item.
- In the Fields tab, create a field using the following image:
Part 2: Remove the Case Number Field from the Inbox Item Object Layout
- In the Layouts tab, go to Inbox Item Detail Page Layout.
- In the Organization and Region section, remove Case Number.
Part 3: Update the Case Number Object Layout
- Go to Objects > Case Number > Case Number Detail Page Layout.
-
Add a Related Object Section using the following image:
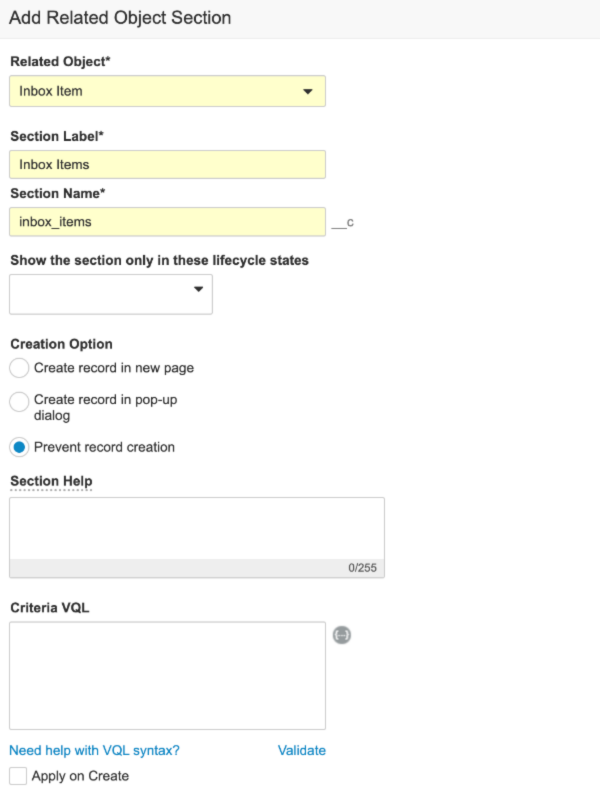
- Move the Inbox Item section between the Case Versions and the Workflow Timeline sections.
- Edit the Inbox Item section columns to include:
- Name
- Lifecycle State
- Case
- Priority
- New Info Date
- Source Document
Create a Case Test Result Icon
The following configuration was added to promptly determine whether a Case Test Result is outside the normal high or normal low range using an icon:
Part 1: Create a Formula Field for the Case Test Result Object
- Go to Configuration > Objects > Case Test Result.
- In the Fields tab, create a new field using the following information:
- Step 1: Formula
- Label: I
- Name:
icon__c - Status: Active
- Select Display in default lists and hovercards
- Return Type: Icon
- Set Default Value:
If(And(Or(isBlank(normal_low_value__v),isBlank(result_value__v),result_value__v>value(normal_low_value__v)),Or(isBlank(normal_high_value__v),isBlank(result_value__v),result_value__v<value(normal_high_value__v))),null,icon("exclamation-triangle", "#ff0000", "Out of normal range"))- Select Show in Header
Part 2: Add the Formula Field to the Case Object Layout
- Go to Configuration > Objects > Case > Case Page Layout.
- In the Test Results section, add the I column between the Result (Unit) and Normal High Value columns.

Create a Case Nullification Workflow for the Case Lifecycle
The following configuration was added to make nullifying a Case more accessible to users. Perform the steps below to create a Case nullification workflow and add a Case nullification entry action.
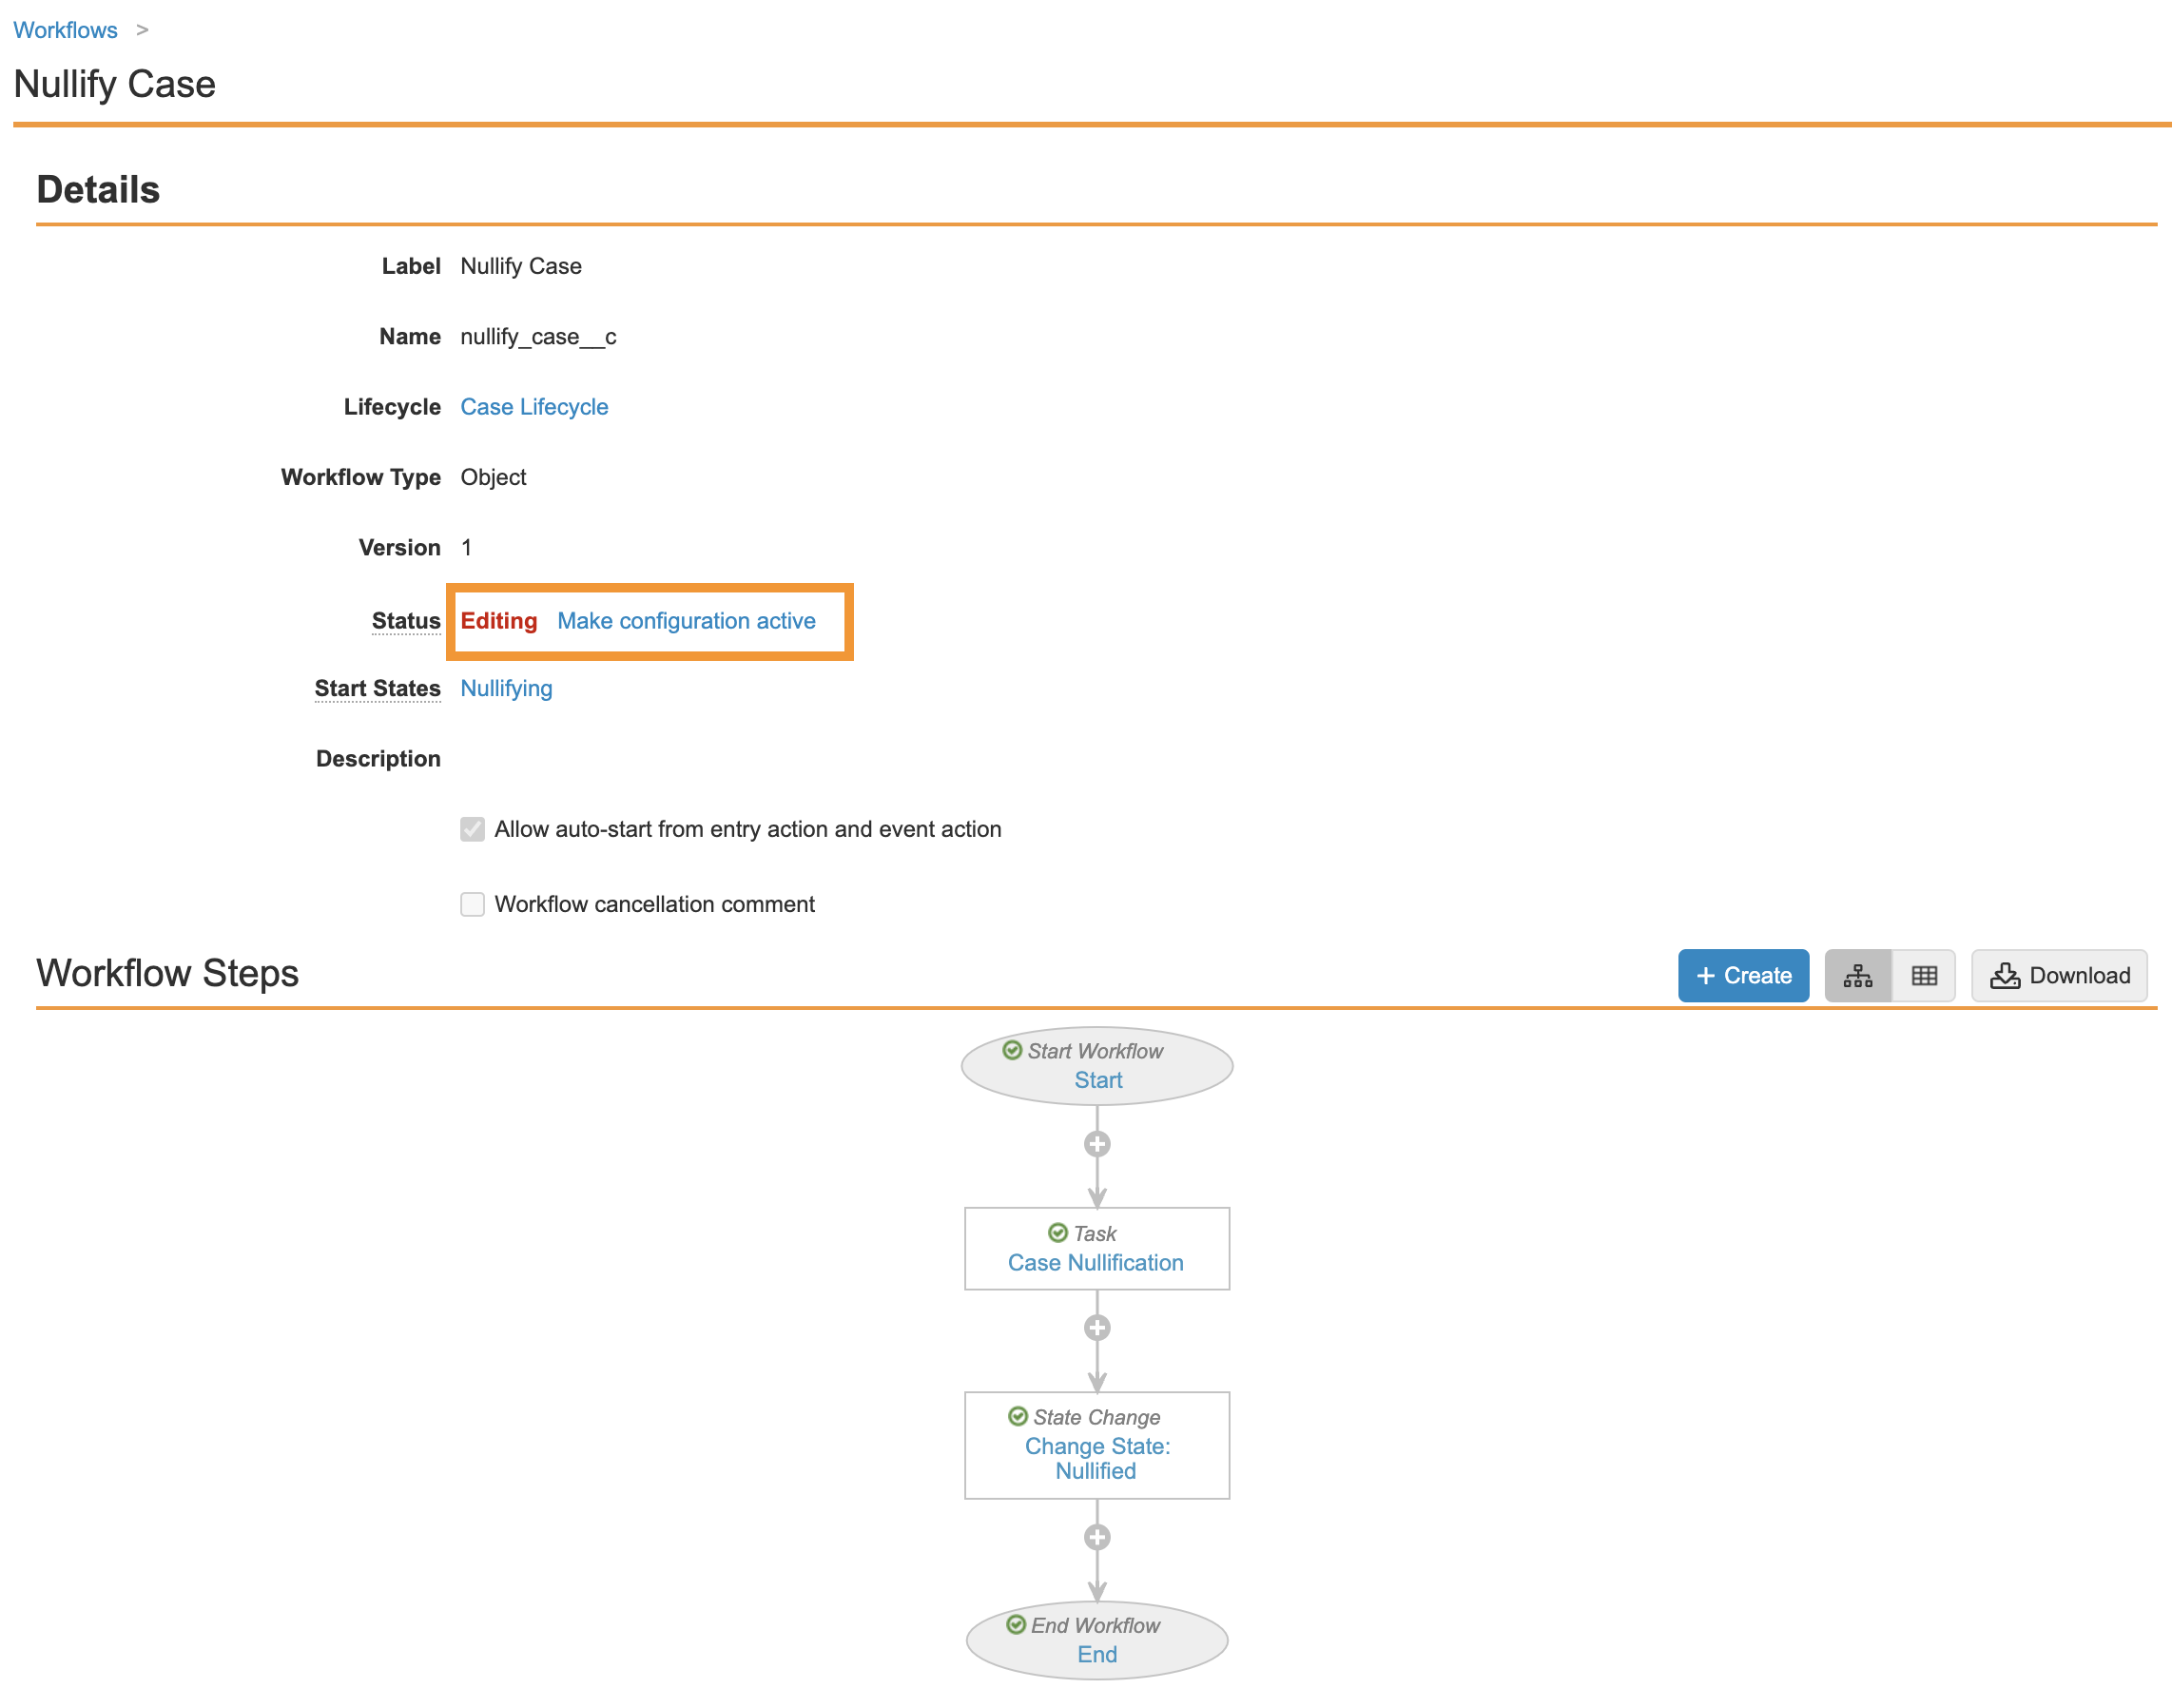
Part 1: Create the Nullify Case Workflow
- Go to Configuration > Workflows.
- Create an Object Workflow.
- Complete the Create Workflow Details section with the following information and save the page:
- Label: Nullify Case
- Name:
nullify_case__c - Lifecycle: Case Lifecycle
- Edit the Start step with the following information:
- Next Steps: Create Step > Case Nullification
- Start Options:
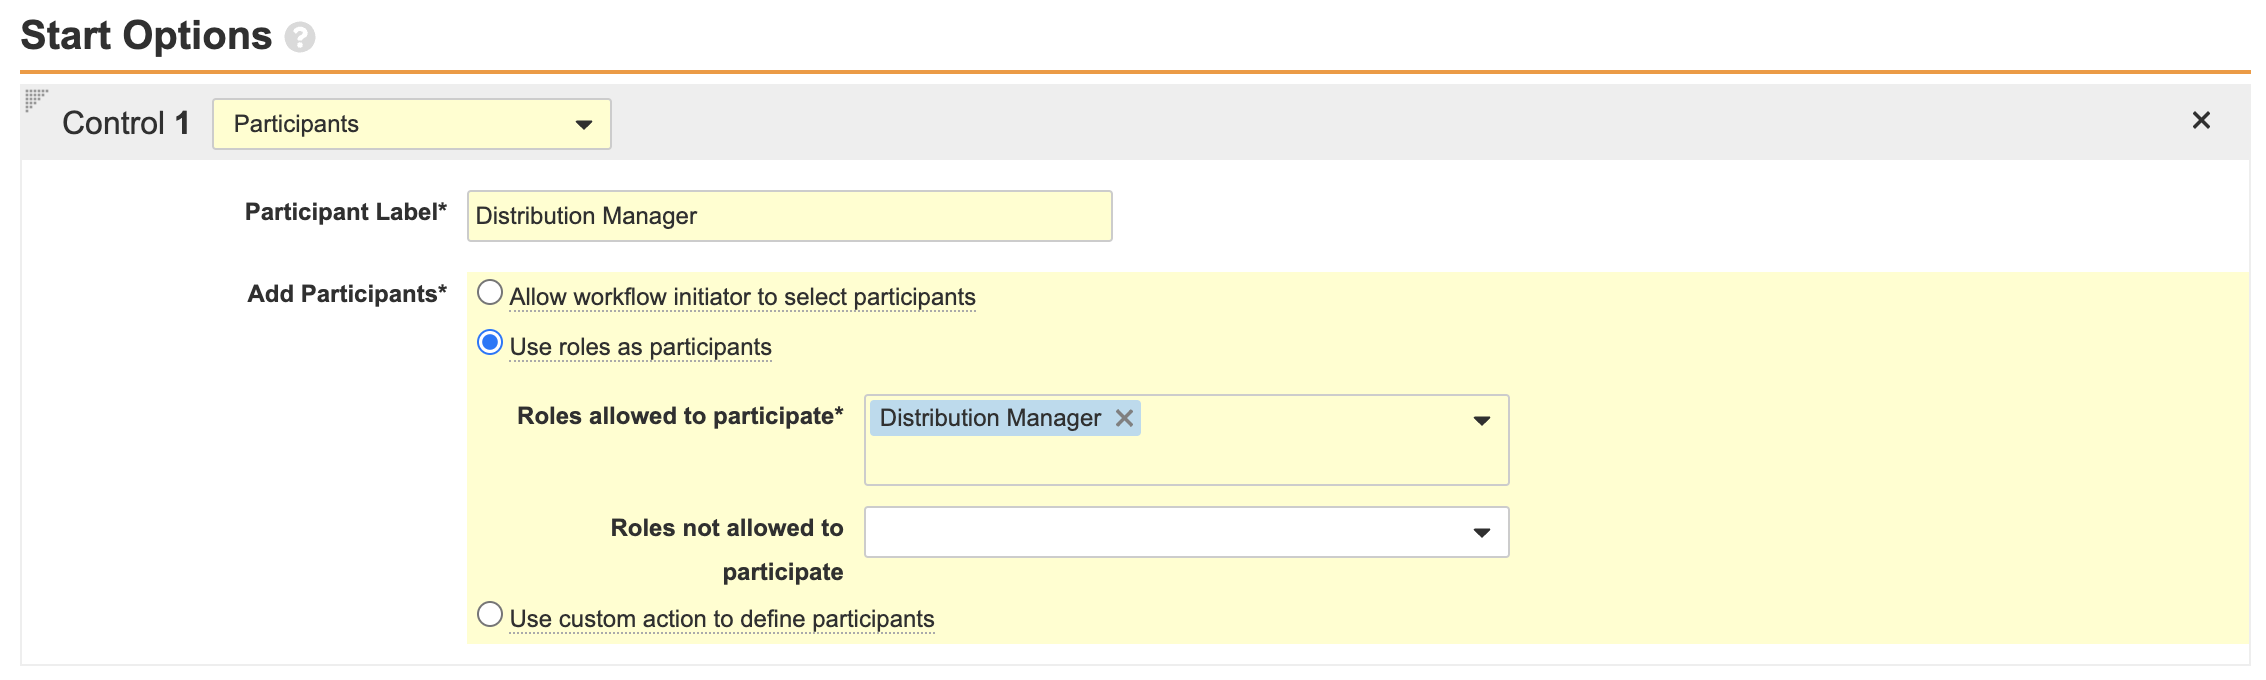
-
Edit the Case Nullification workflow step:
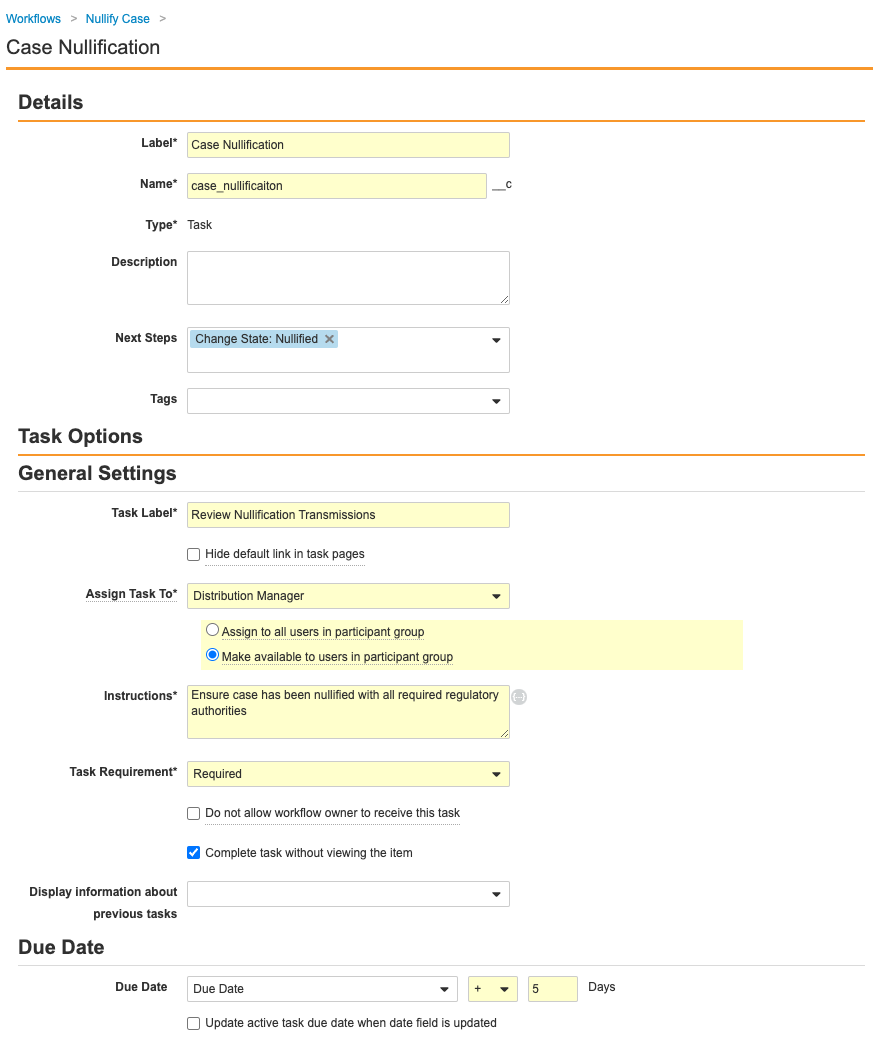
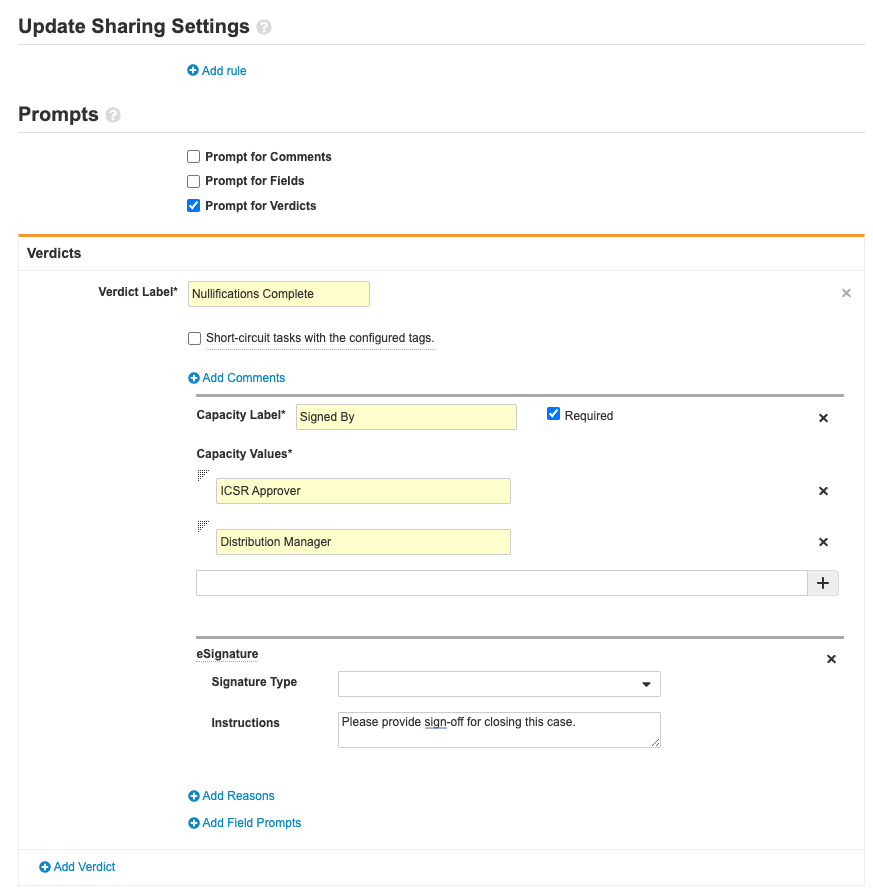
-
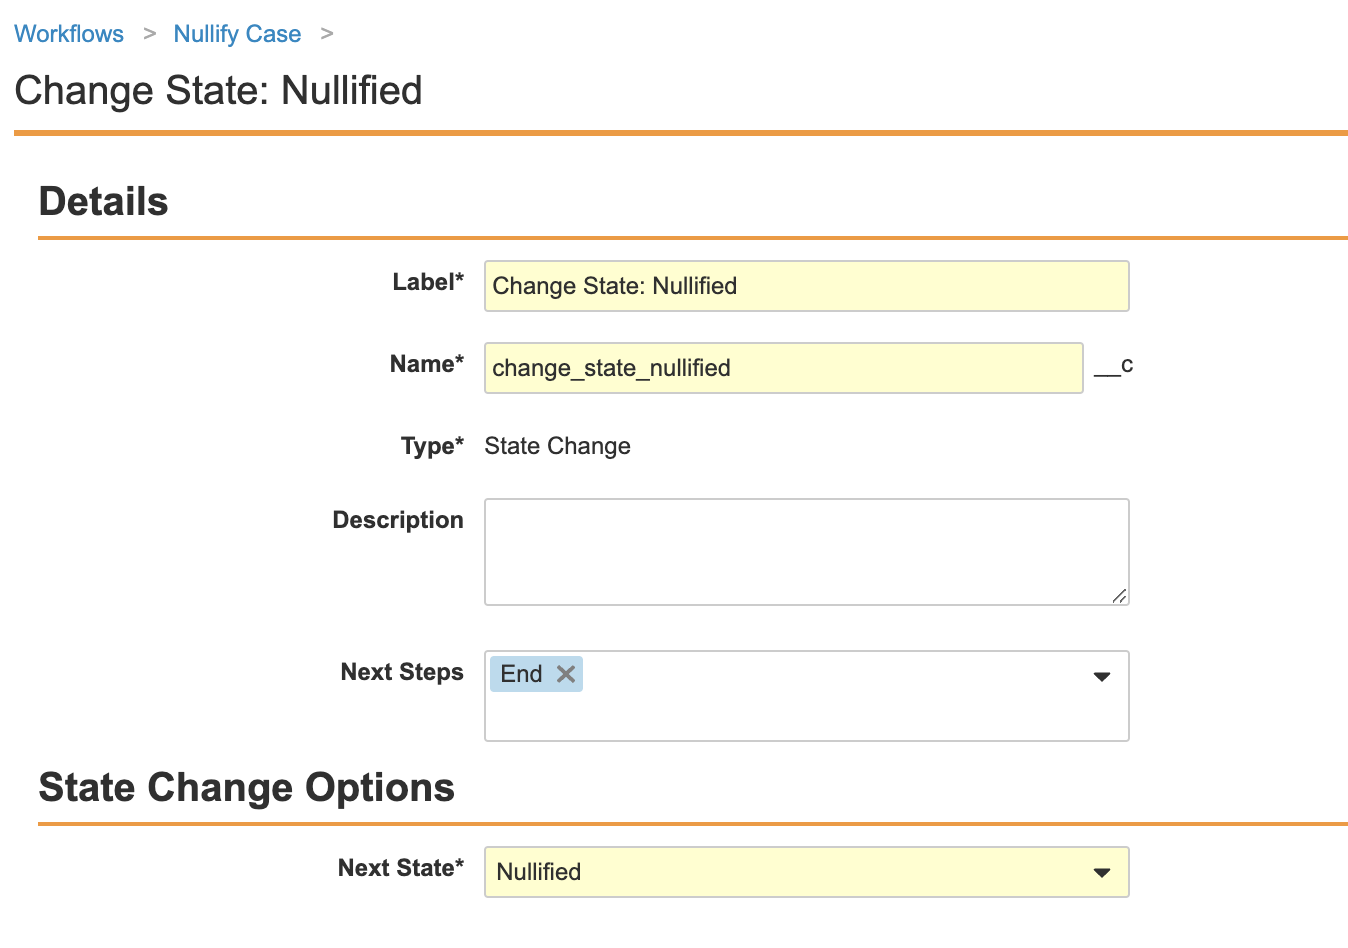
Edit the Change State: Nullified step:
- Ensure your workflow matches the following image and then select Make configuration active:
Part 2: Update the Case Lifecycle Entry Actions, User Actions, and Permissions
- Go to Configuration > Object Lifecycles > Case Lifecycle.
- Select the Nullifying state.
-
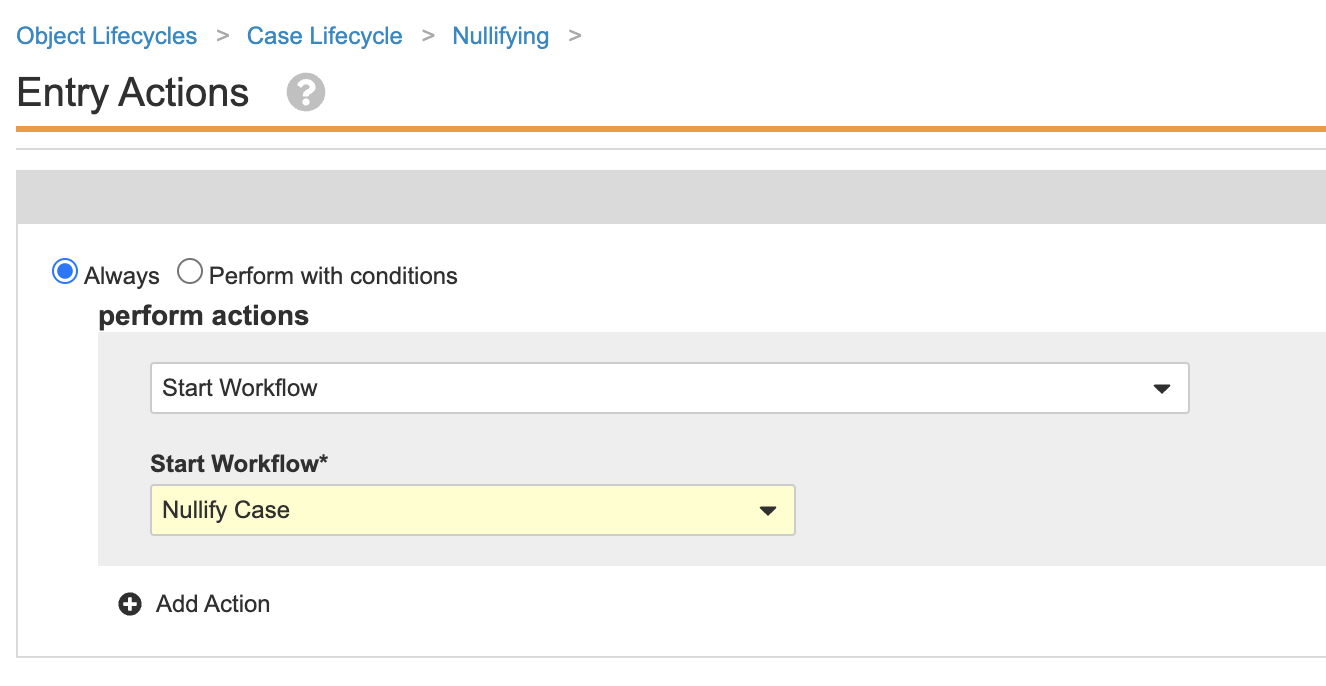
Update the Entry Actions using the following image:
-
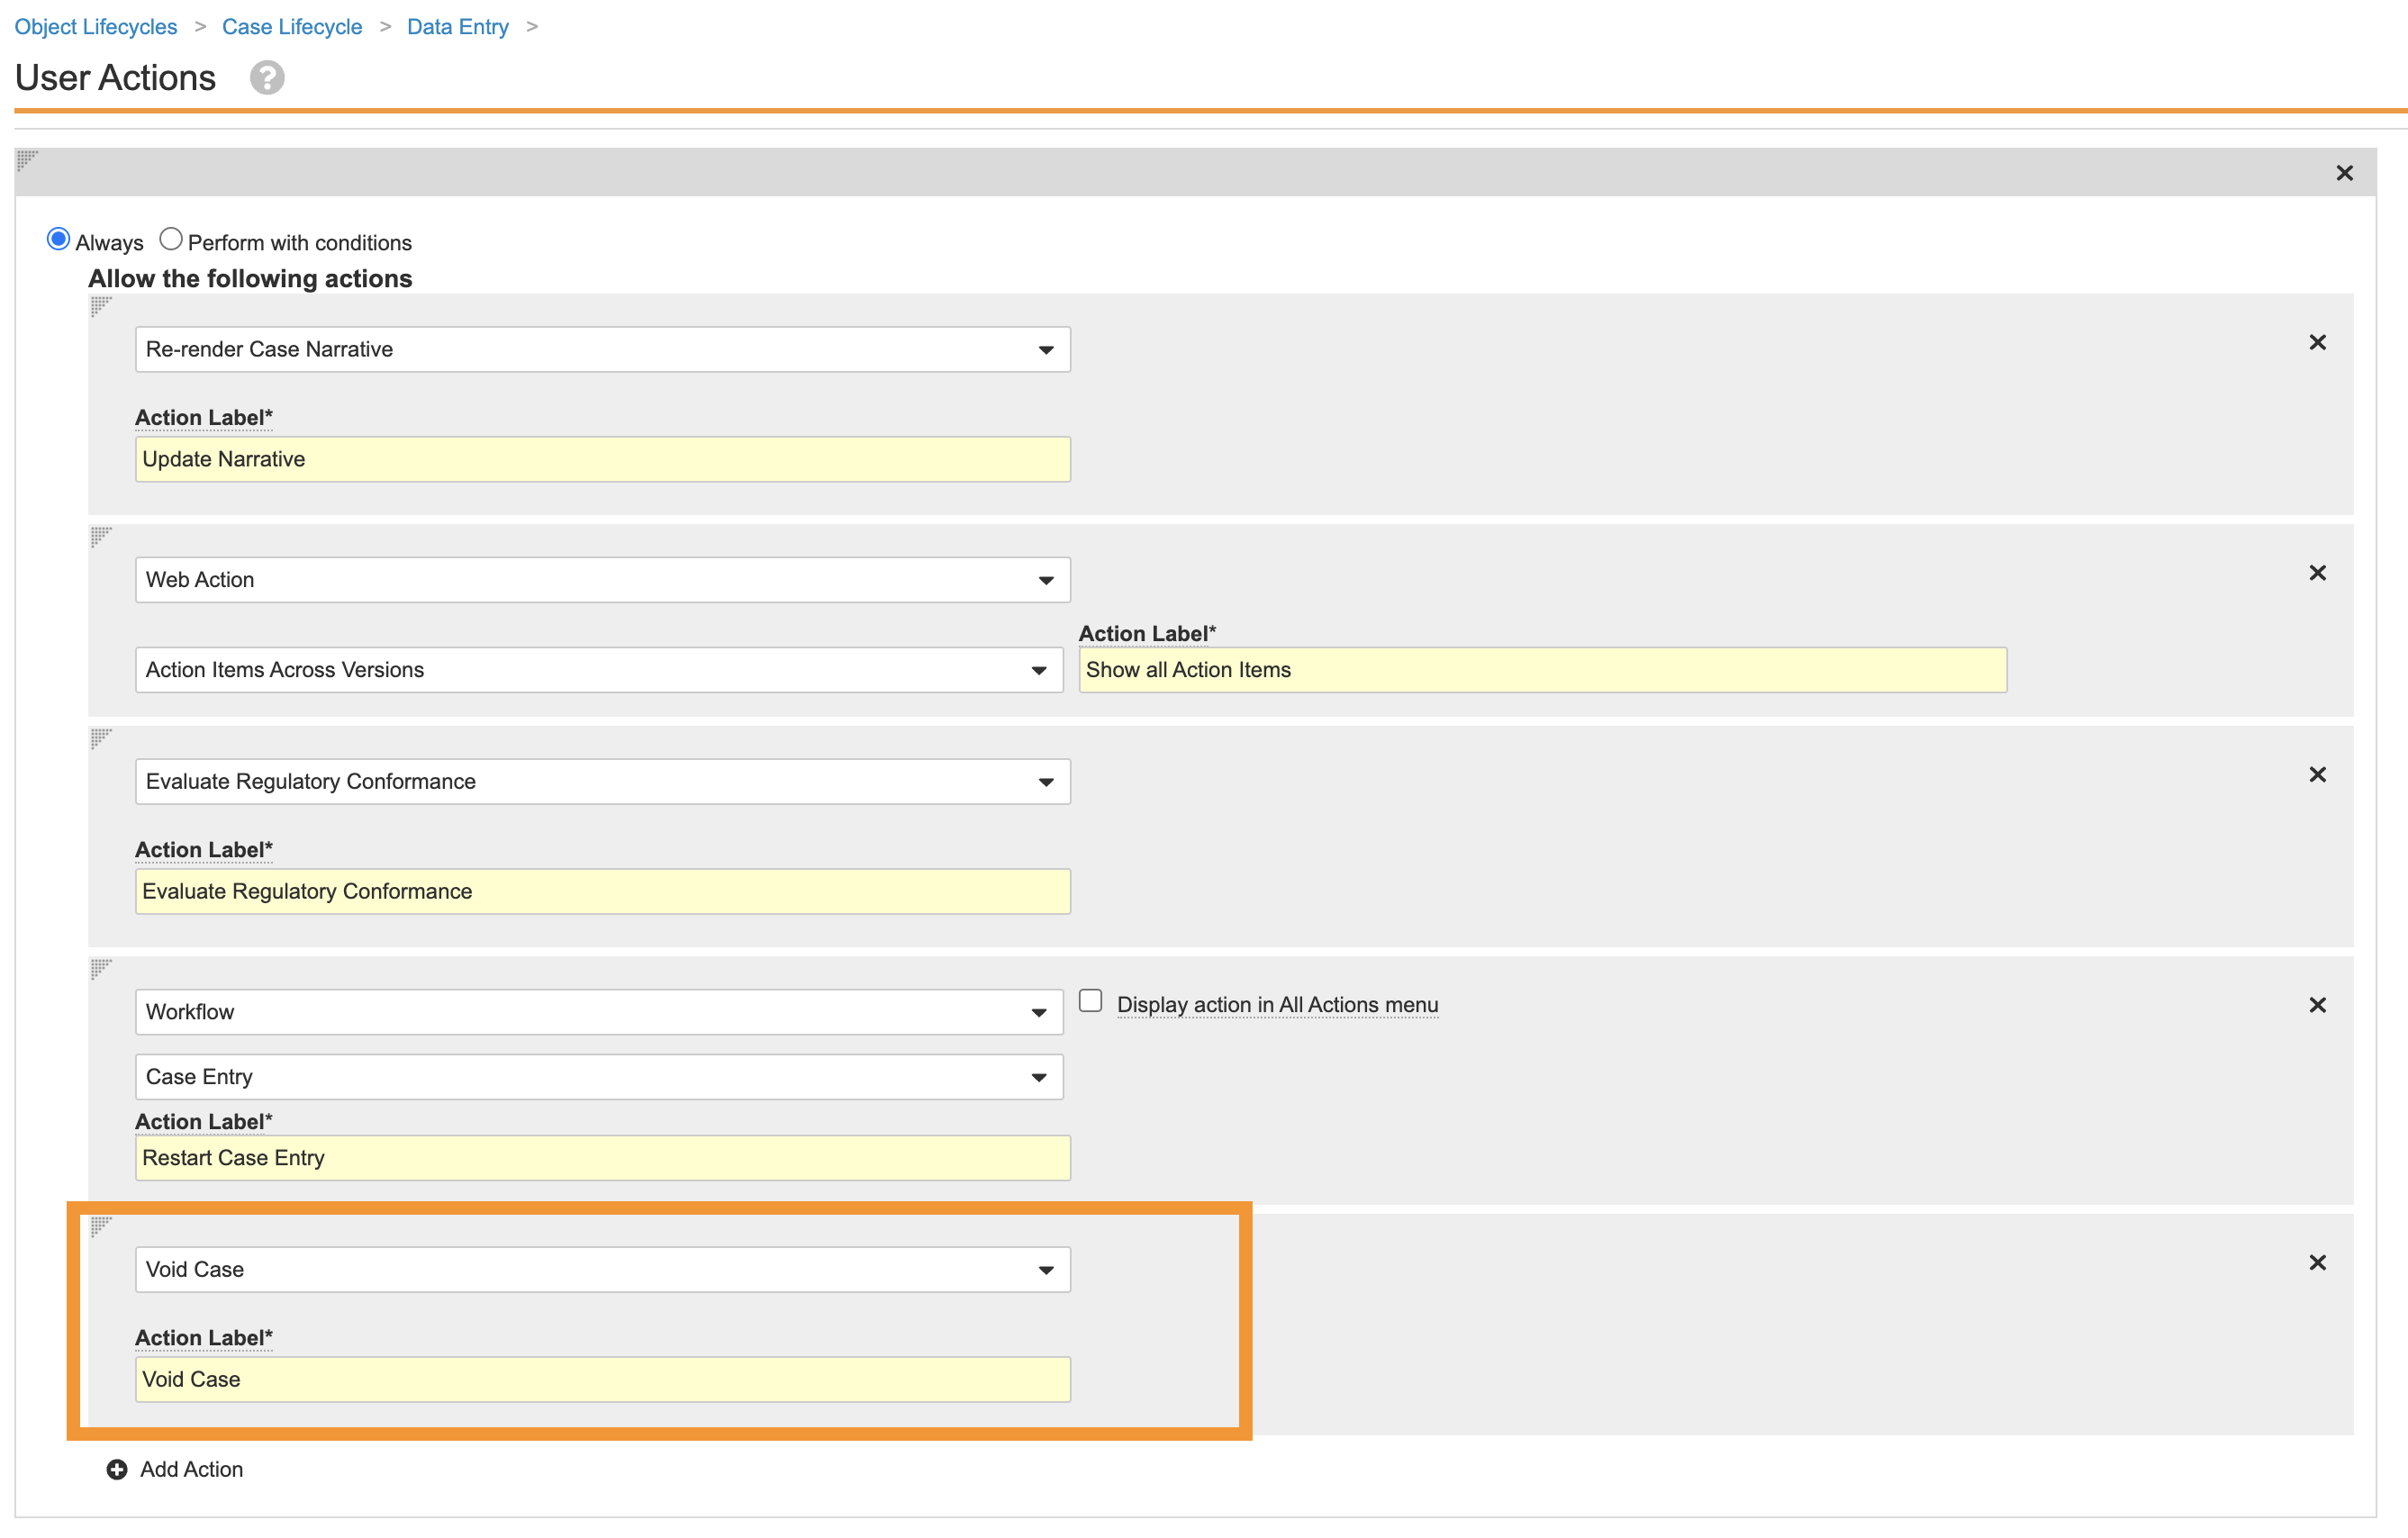
In the Data Entry state, add the following User Action using the image below:
- Repeat step 4 for the following states:
- Medical Review
- QC
- Revision
- Triage
- Unblinded
- Edit the Case Lifecycle > Roles.
- Remove Read permission for the Nullified and Voided states for the following Case Roles:
- Data Entry
- Intake
- Medical Coder
- Medical Reviewer
- QC
- Safety Writer
- Translator
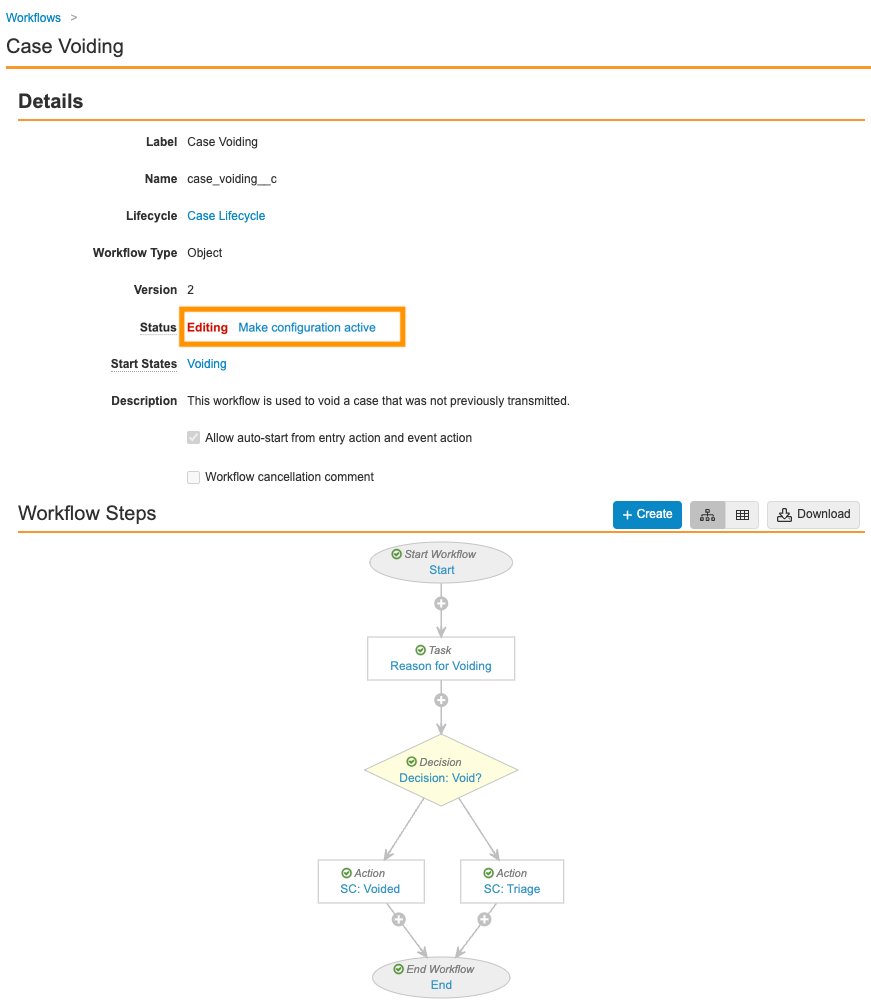
Part 3: Update the Case Voiding Workflow
- Go to Configuration > Workflows > Case Voiding.
-
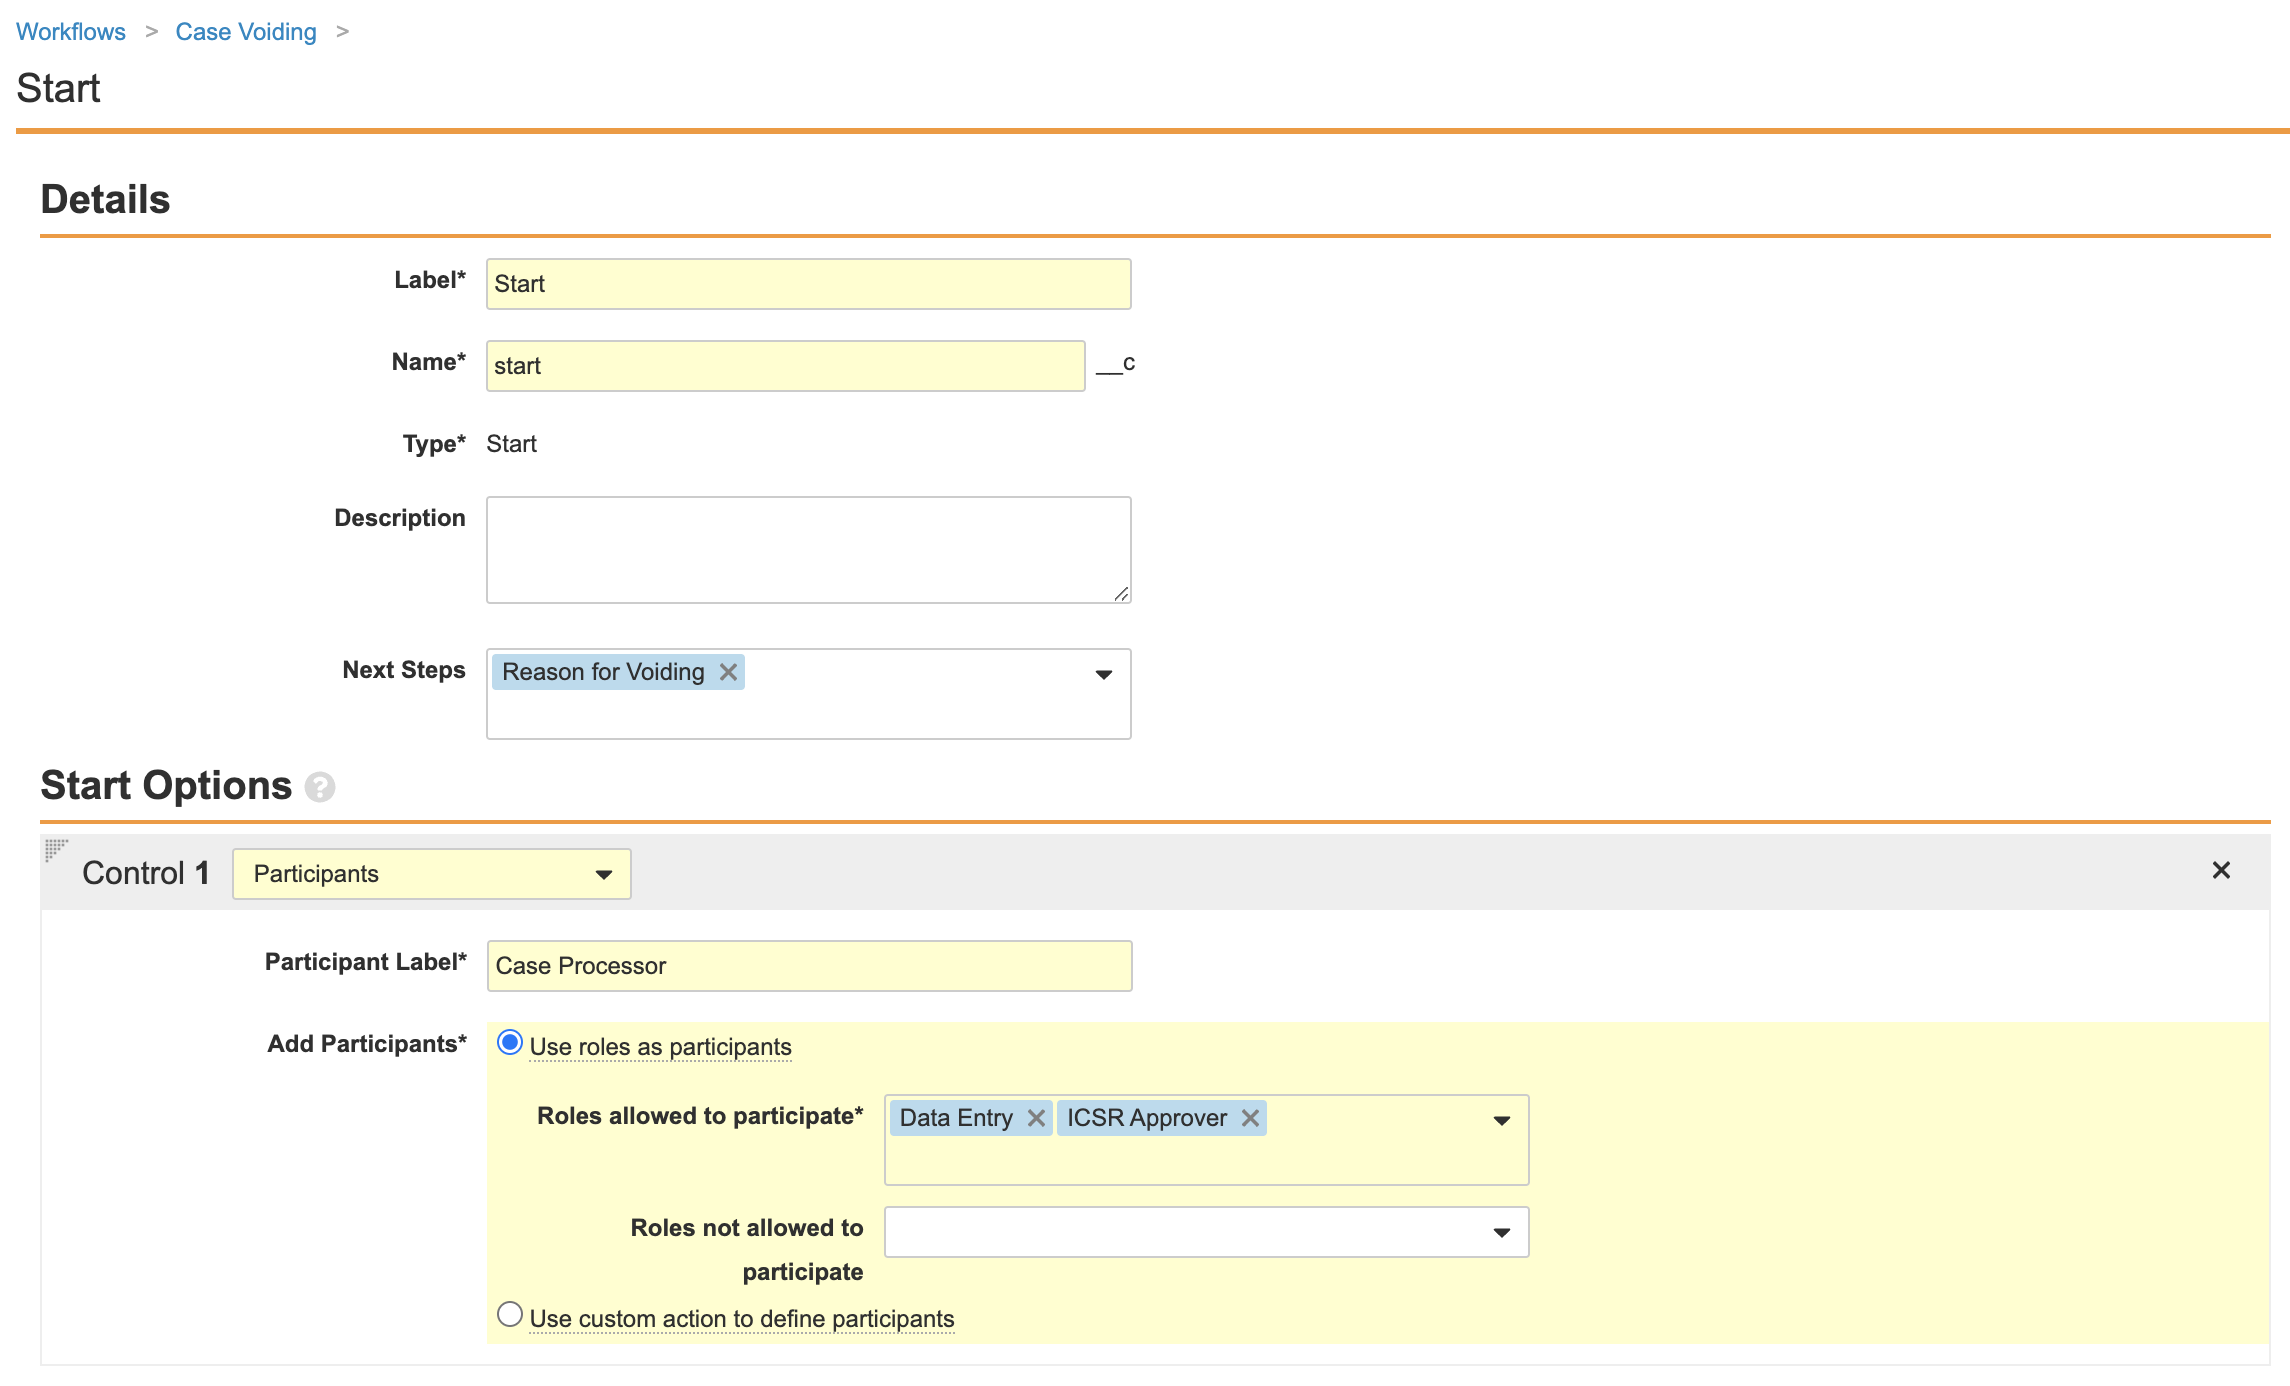
Ensure the Start step matches the following image:
-
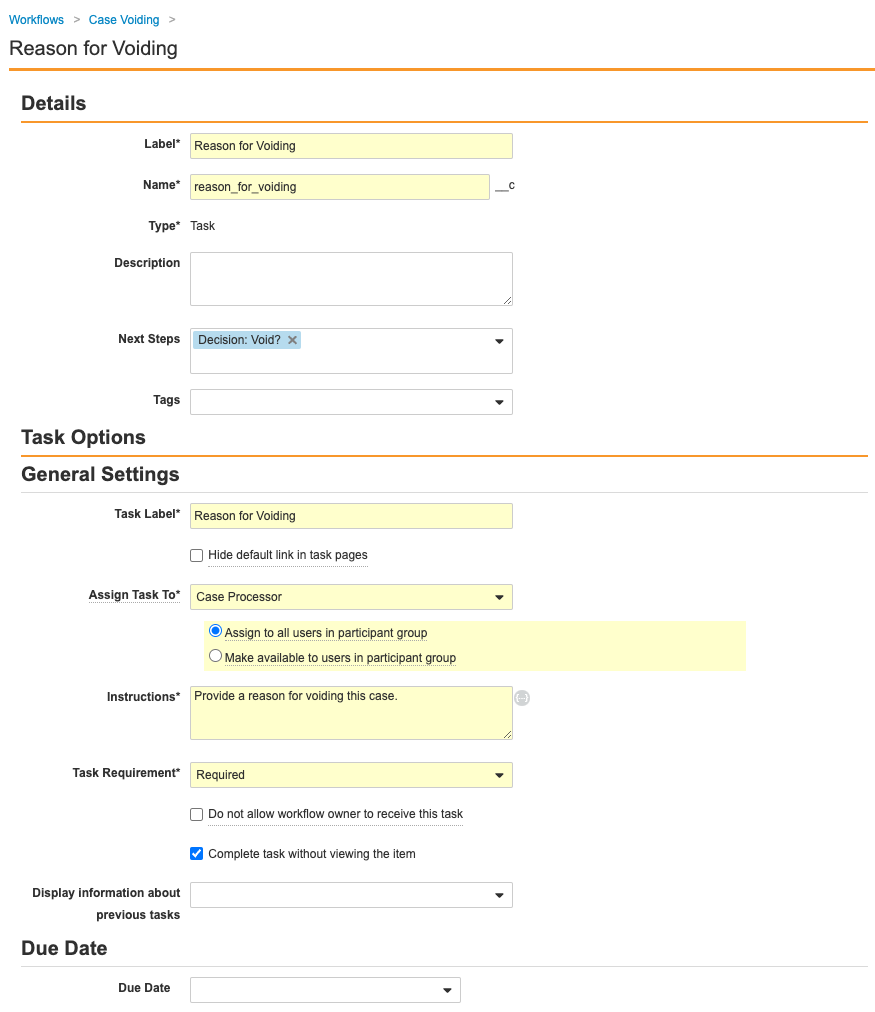
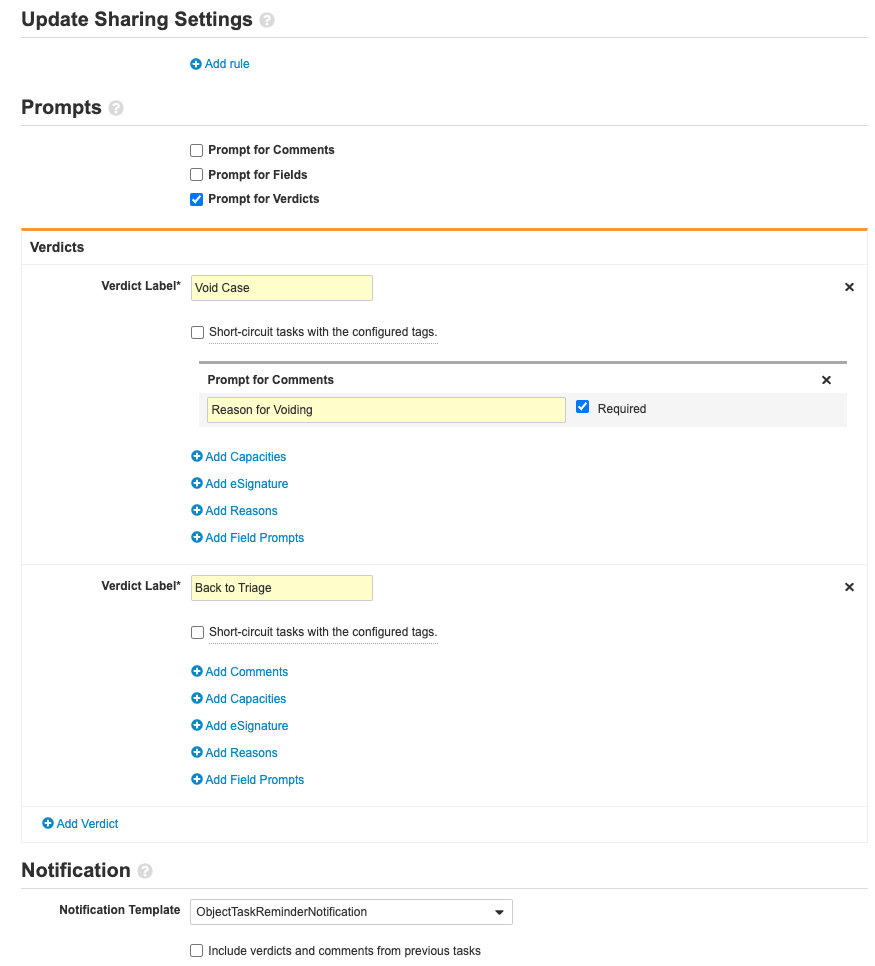
Ensure the Reason for Voiding step matches the following image:
-
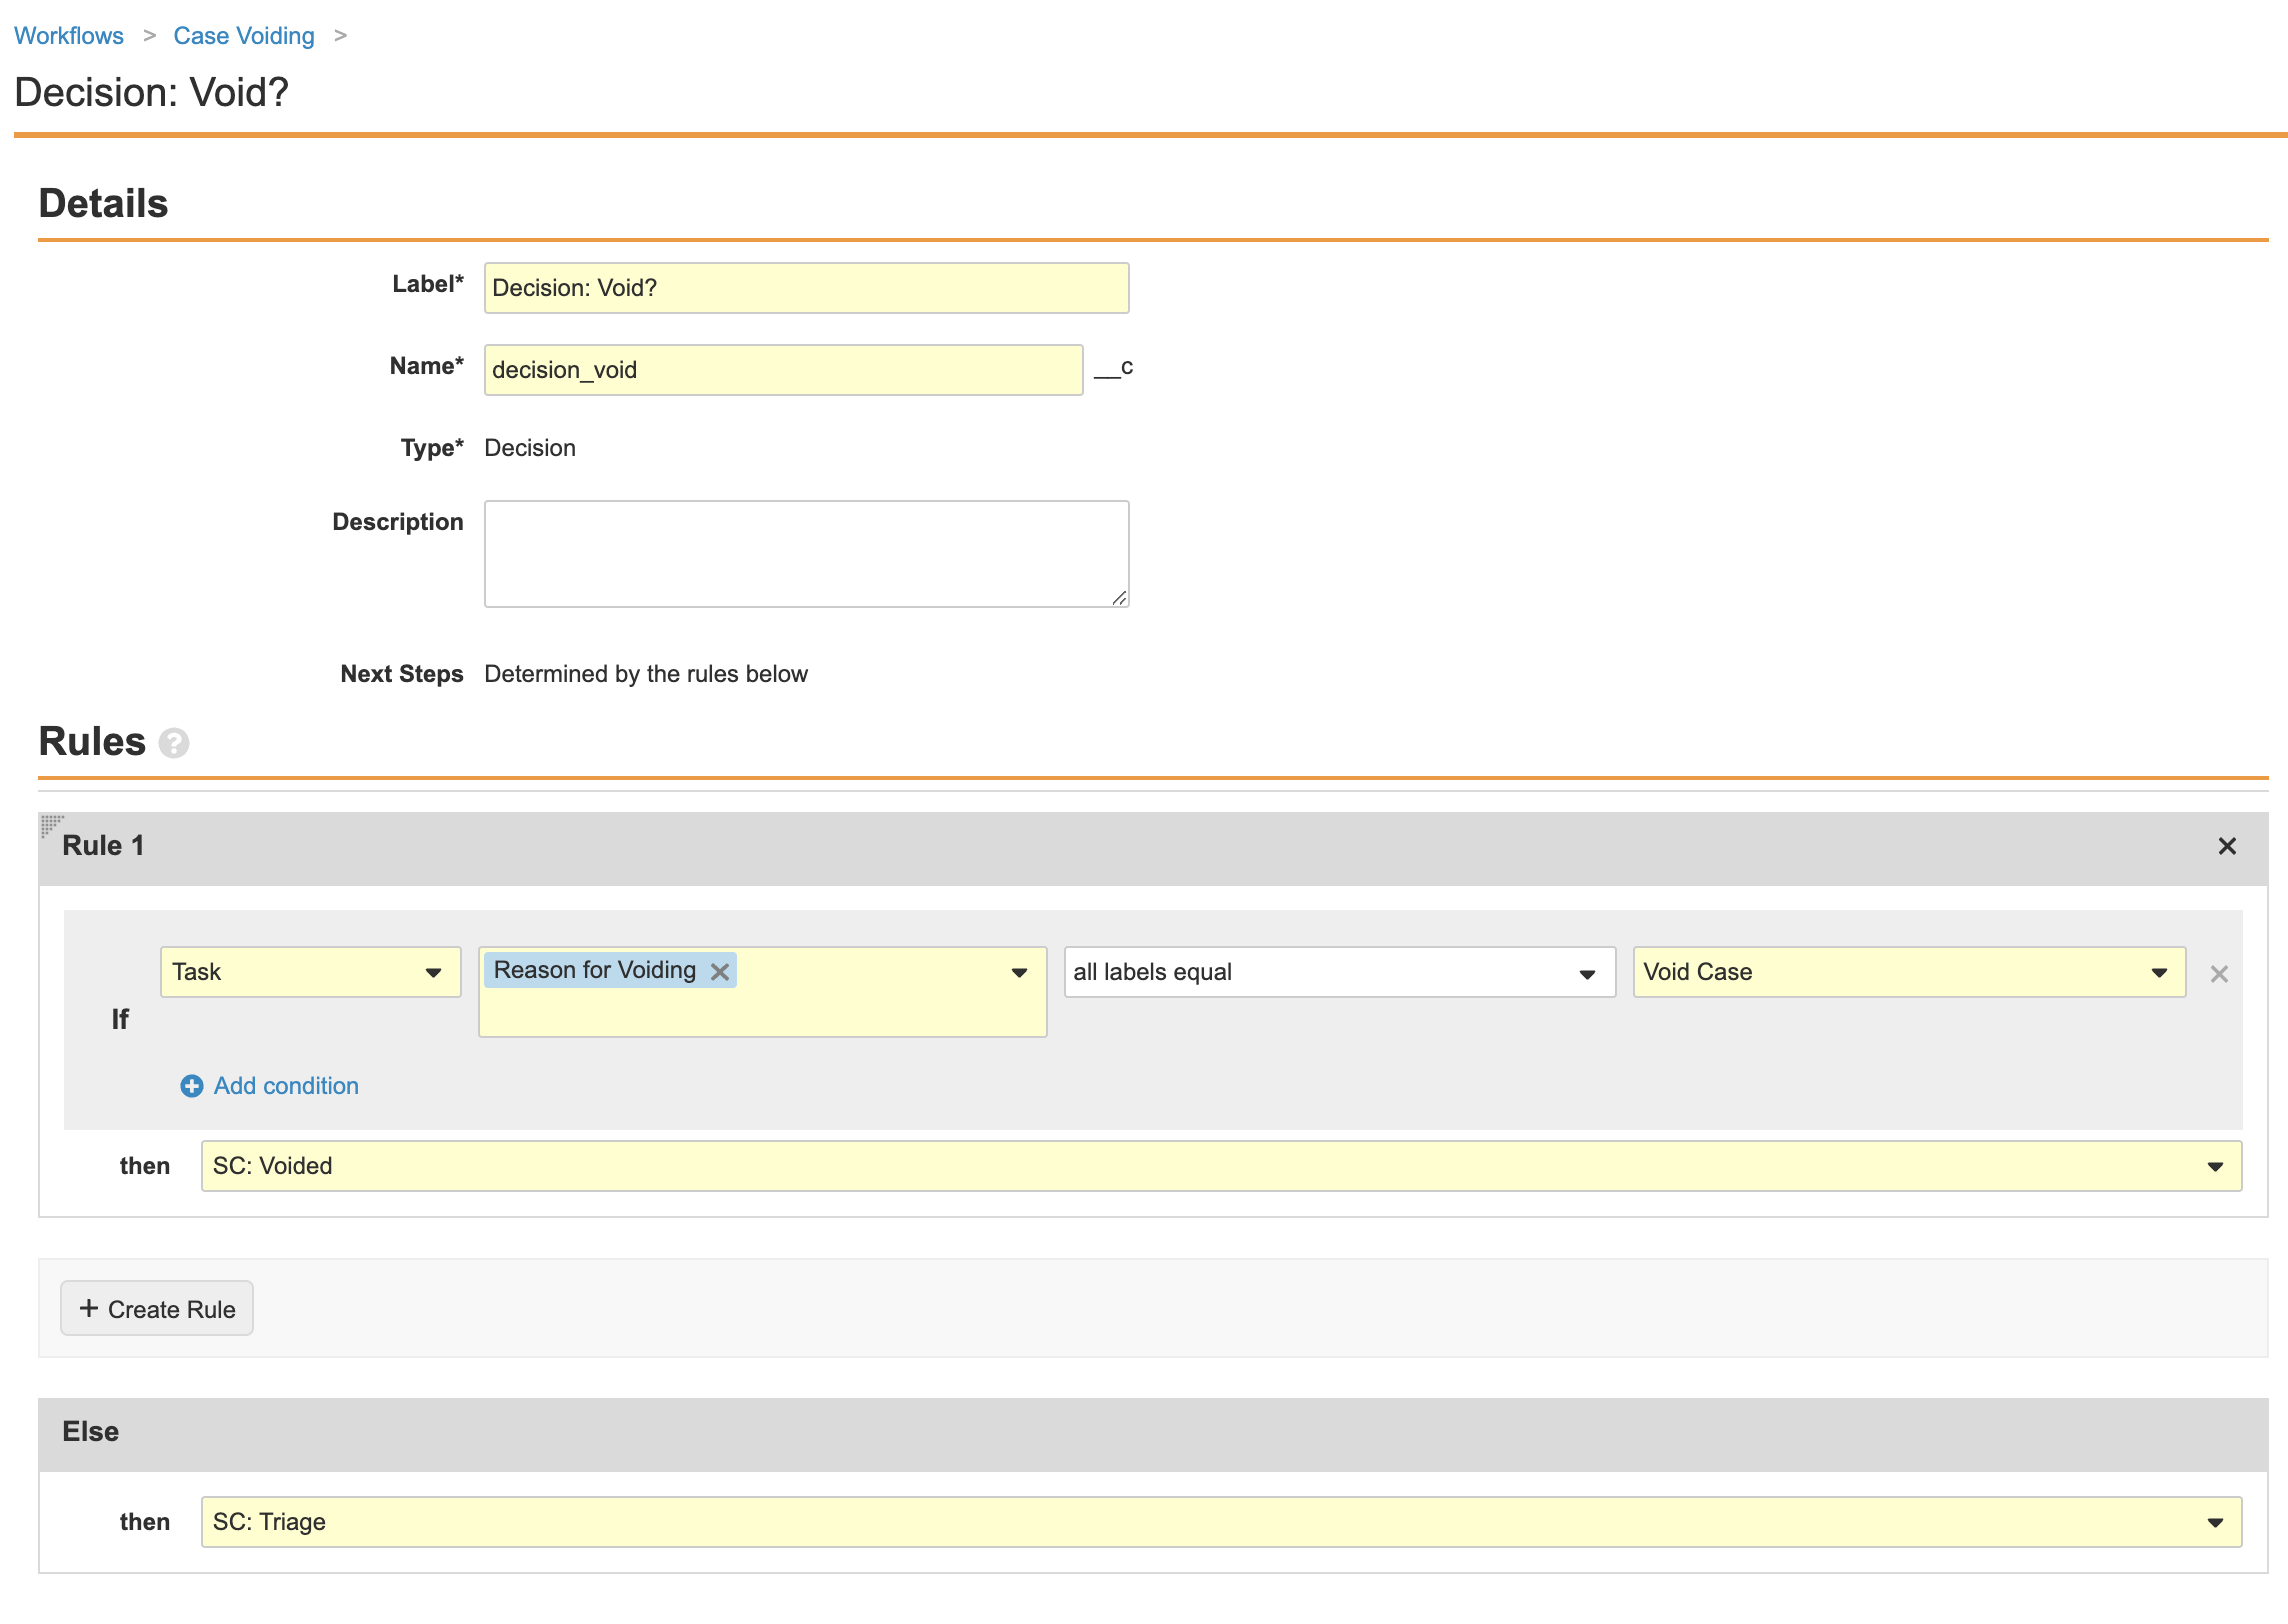
Complete the Decision: Void? step using the following image:
-
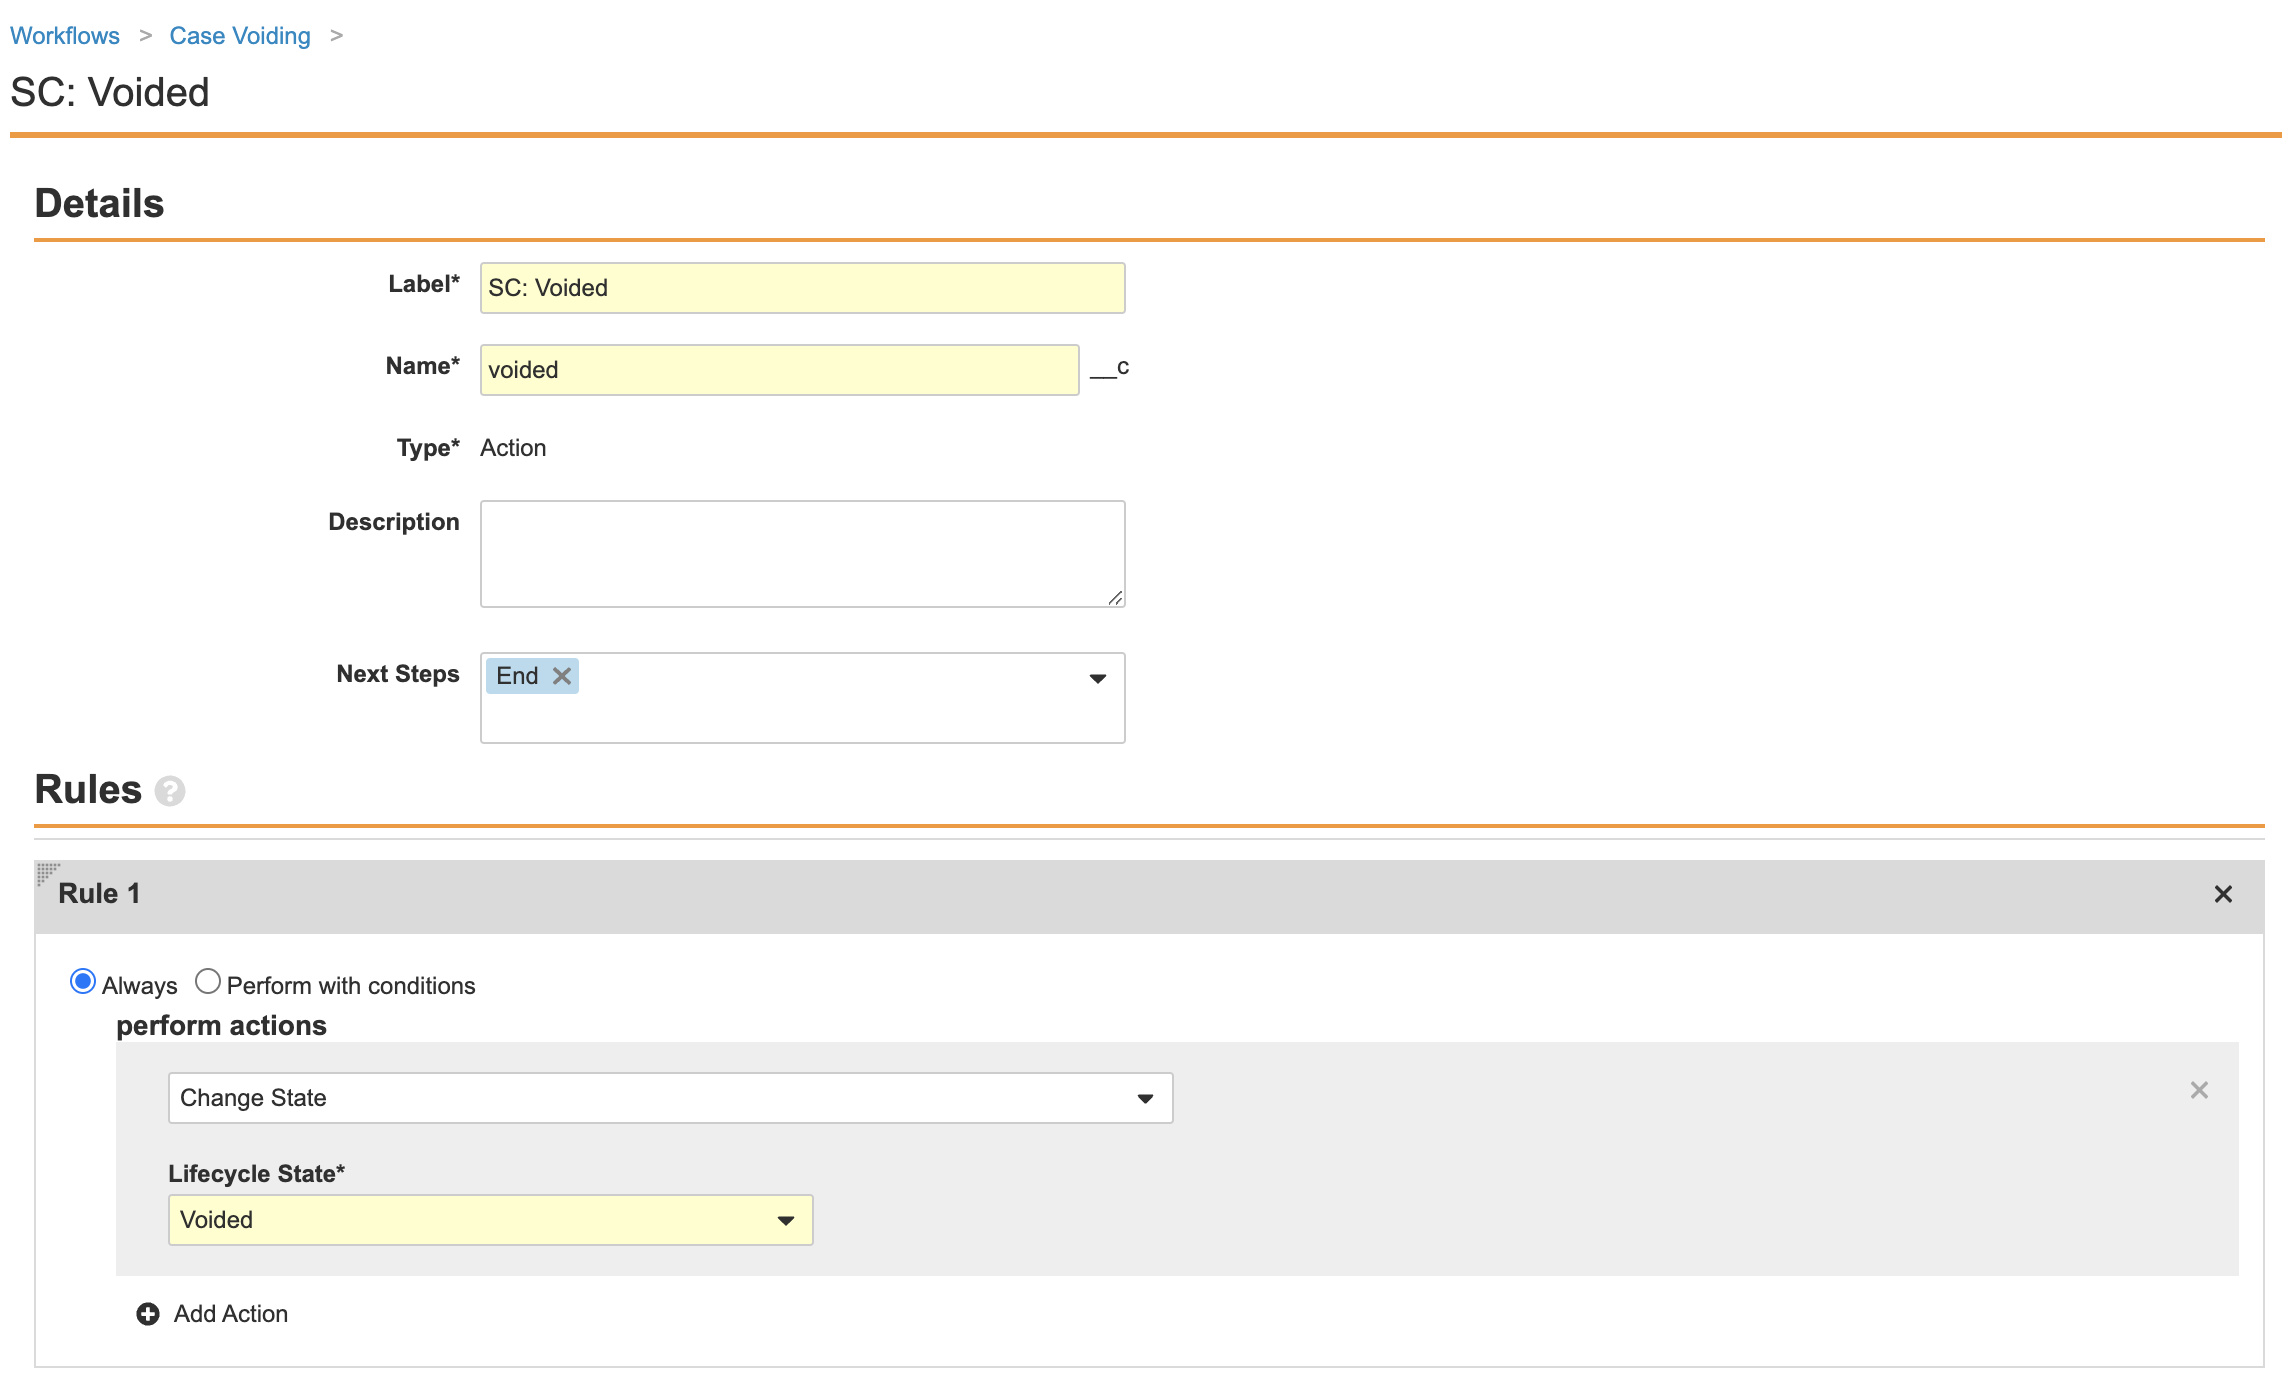
Complete the SC: Voided step using the following image:
-
Complete the SC: Triage step using the following image:

- Ensure your workflow matches the following image and then select Make configuration active:
Update the Transmission Object Layout for Submission Records
Support for the Health Canada Transmission Profiles and Message Types feature was added to Vault Safety in 22R1. For this release, the Message Type (HC) (message_type_hc__v) field could be added to the Submission object layout by an Admin to allow users to specify the Message Type when preparing a Submission to Health Canada.
The following template configuration was added to include this field on the Submission object layout by default for Vaults created in 22R2 or later. A layout rule was also created to display the field only for the Health Canada destination:
- Go to Configuration > Objects > Transmission.
- In the Layouts tab, go to the Submission Detail Page Layout.
- Add the Message Type (HC) (
message_type_hc__v) field to the Details section. - Create a Layout Rule for this layout using the following information:
- Label: Hide HC Fields
- Name:
hide_hc_fields__c - Status: Active
- Type > Values: Fields > Message Type (HC)
- IF his Layout Rule Expression is TRUE:
destination__vr.name__v != 'Health Canada'